Working and output
Working in order
History, undo and redo, actions, presets, copying and pasting settings, and processing many files at once: how Procol keeps track of your work and helps you repeat it.
In the darkroom order is everything: the printing sheet with the times pencilled in, the baths always in the same sequence, the recipe written on the back of the work print. Procol keeps that order for you. Every move stays in a history and can be undone; the recipes you like become presets; sequences of moves become actions you can repeat across a whole series.
History#
Everything you do to the photo becomes a step: the style you chose, each adjustment, a filter, a reset, a crop, a brush stroke. History keeps them in line, from first to last.
The History panel stays hidden until you ask for it: View › Show History, or Window › History. It appears at the bottom of the left sidebar. Even hidden, it keeps recording everything.
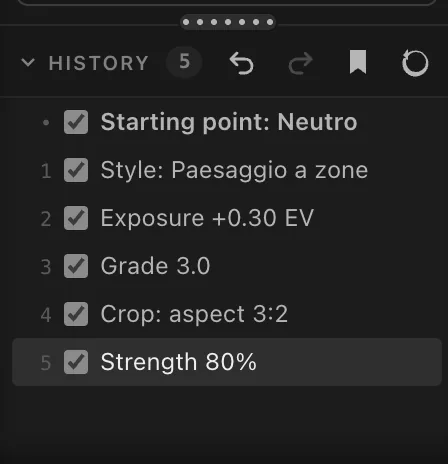
The first step, marked with a dot, is the starting point: the state of the print when History began. Then come the numbered steps, each named for what happened: Style: Paesaggio a zone, Exposure +0.30 EV, Strength 80%.
What you can do:
- Tap a step to go back to that point. The later steps stay, in grey: tap one to bring them back. If you make a new change instead, the grey ones disappear and the story starts again from there.
- The tick next to a step switches it off without removing it: the print is recalculated as if that step weren’t there. Tick it again and it’s back. It’s the most honest way to ask yourself ‘did that touch really help?’.
- The × removes the step. Here too the print is recalculated.
Nothing is destructive: the original photo is never touched; each step is only an instruction that Procol carries out again.
When you drag a slider for a long time, History doesn’t fill up with a hundred steps: consecutive moves of the same slider become a single step. The same goes for styles tried one after another and for the style strength.
At the top of the panel you’ll also find:
- Undo and Redo, the two arrows;
- the bookmark, which turns History into an action (see below);
- the circular arrow, which starts again from scratch: the current state becomes the new starting point and the earlier steps are forgotten.
Tap the History title to close or open the list, leaving just its header showing.
Undo and Redo#
Edit › Undo (⌘ Z) goes back one step; Edit › Redo (⇧ ⌘ Z) puts it back. The menu always tells you what you’re about to undo, for example Undo ‘Exposure +0.30 EV’, and a message at the bottom confirms what was undone.
Undo and Redo move along the same History: undoing three times is the same as tapping the third step from the end.
A series of photos in the same light#
When you open a new photo, Procol keeps the style and adjustments you had on the previous one; only what belongs to the single photo starts from zero, that is, the crop and the brush strokes. For a series shot in the same light, opening the next photo and touching it up is often enough.
When there are many photos, or you want to come back to the same recipe a month from now, there are three tools, from the simplest to the most powerful:
| Tool | What it carries | When to use it |
|---|---|---|
| Copy and paste settings | all the adjustments, in one go | two or three photos, in the same session |
| Presets | a complete recipe, with a name, to be found among the styles | a recipe to keep |
| Actions and Apply to multiple files | a sequence of steps, even on a hundred photos | a repeated job, a whole series |
Copy and paste settings#
Edit › Copy Settings (⌥ ⌘ C) takes all the print’s adjustments, masks included. Open another photo, or come back to this one after trying other routes, and choose Edit › Paste Settings (⌥ ⌘ V): the print takes those adjustments back, in a single History step.
The crop, the brush strokes and the style strength are not copied: they belong to the single photo or the single print.
The copied settings stay available as long as Procol is open. They also go onto the system clipboard as text, in case you want to paste them into a message or a note.
Presets#
A preset is a style of your own: a complete recipe, with a name, that you find in the Styles column under My presets, with its thumbnail and its i, like the included styles.
Saving a preset#
The included styles, the ones with the small padlock next to the name, can’t be changed: whatever you adjust on top of one of them is always saved as a new preset, a copy with your changes. That’s why the button at the bottom of the Inspector changes its name:
- on an included style it reads Save as New Preset…: the window is called New preset from ‘…’ and suggests a name such as ‘L’istante (variant)’. It won’t take the name of an included style, nor the name of one of your presets that already exists;
- on one of your presets it reads Update Preset…: the window is called Update ‘…’ and the Update button replaces the preset with the adjustments you have now. If you want to keep the earlier version as well, Save as New… makes a copy.
To start from a copy before you’ve changed anything, there’s Duplicate, in the window that opens from each style’s i (or Edit › Duplicate Style): the copy appears straight away under My presets, and the print in front of you stays as it is.
Choose File › Save Preset… (⌘ S), or the button at the bottom of the Inspector. A window opens:
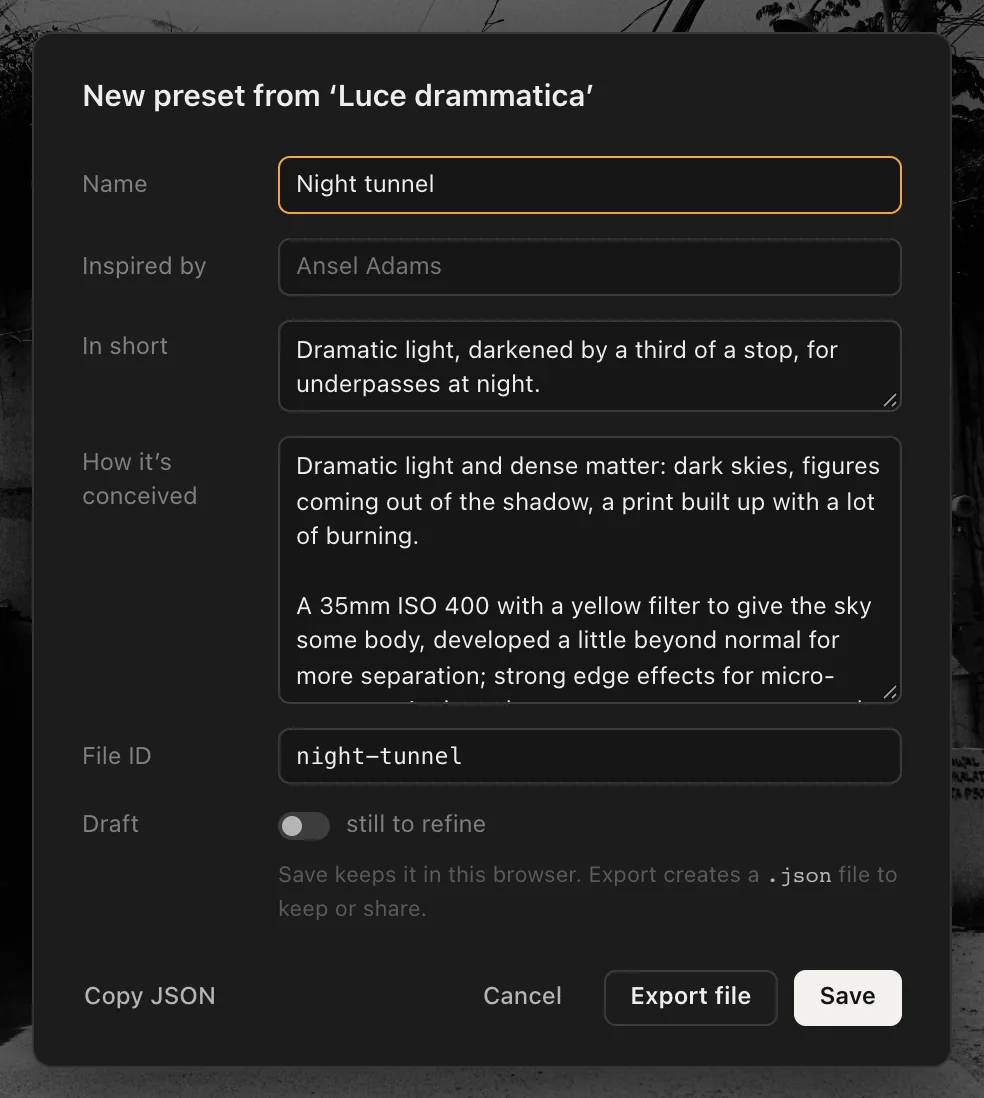
- Name: how it will appear among the styles. If you started from an included style and changed it, Procol suggests its name followed by (variant).
- Inspired by: optional, the photographer or the print you had in mind.
- In short: one line saying what defines the preset.
- How it’s conceived: the choices in the recipe and the reasons for them, as long as you like; a blank line separates paragraphs. You’ll read it again in the style’s Info, and a year from now you’ll be glad of it.
- File ID: the file name when you export it. Procol works it out from the name; you rarely need to touch it.
- Draft: marks the preset as still to refine. The word DRAFT appears on the thumbnail.
Then choose:
- Save: the preset stays in this browseron this Mac, among My presets, and becomes the style in use. The change count and the dot on Reset go back to zero: from here on, changes are counted from your preset.
- Export file: downloads the presetsaves the preset, with the macOS save window, as a small
.jsonfile, to keep or to send to someone. - Copy JSON: copies the same content to the clipboard.
The preset holds every adjustment in the Stages, masks included. It doesn’t hold the crop or the brush strokes, which apply only to the photo you made them on.
To correct one of your presets, choose it, change it and save again under the same name: Procol already suggests the name and ID, and the new version replaces the old one.
Importing a preset#
Import presets…, at the bottom of the Styles tab, or File › Import Presets… (⇧ ⌘ I), loads one or more preset .json files. You’ll find them among My presets, and the last one imported becomes the style in use. A preset with the same ID as one you already have replaces it. A message tells you which files went in and which weren’t valid presets.
Deleting a preset#
Tap the × on the preset’s thumbnail (with a mouse it appears on hover, next to the i), or Delete preset… in its Info. Procol asks you to confirm.
Unsaved changes#
If you’ve changed the style in use and haven’t saved, Procol reminds you in three ways: the ● N changes count next to the name, the amber dot on Reset and the word edited in the status bar.
Before a move that would lose those changes, that is, changing style or pressing Reset, a window asks you: Cancel, Don’t save or Save preset…. If you close or reload the page, it’s the browser that asks you to confirm, with its own warning.
Actions#
An action is a stored sequence of steps: a style, then heavier grain, then burned corners, then the strength at 85%. You run it again with one tap on another photo, or on a hundred.
Actions live in the Actions tab of the left sidebar. Procol already has one as an example, Soft reportage: open the tab, tap it to see its four steps, then press ▶ to try it on your photo.
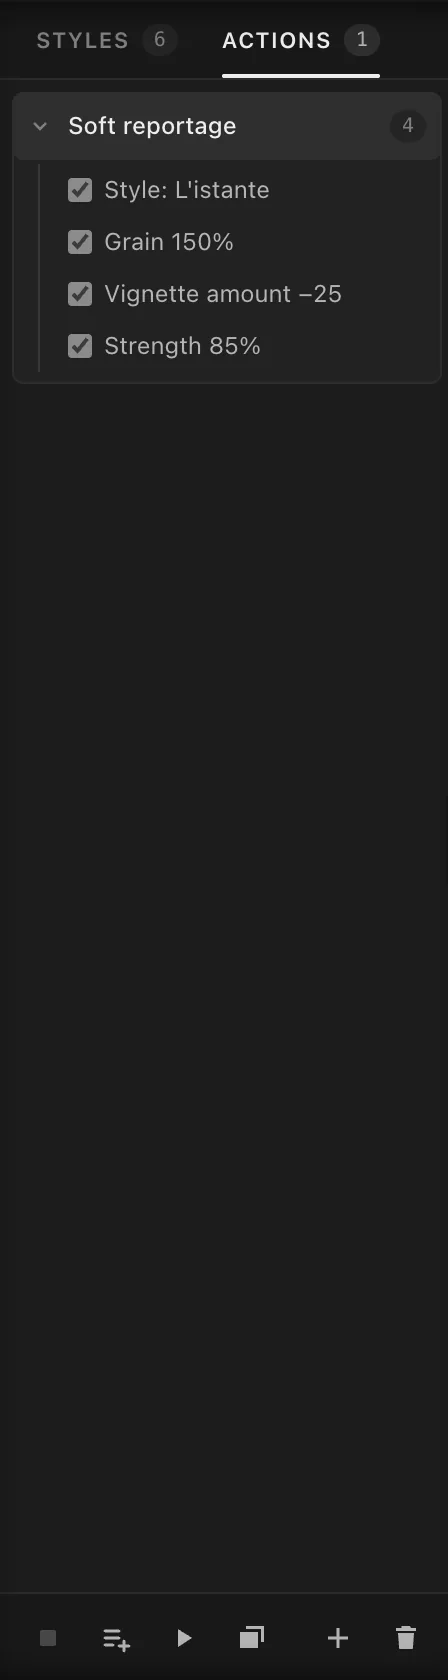
At the bottom of the tab there is a bar of buttons; each one’s name appears when you hold the pointer over it:
| Button | What it does |
|---|---|
| ■ Done | Stops recording steps. |
| Record (the list with the +) | Starts recording steps into the selected action. |
| ▶ Run | Runs the selected action on the open photo. |
| Apply to multiple files… (the two sheets) | Runs the action on many photos and saves the results. |
| + New action | Creates a new action, asks for its name and starts recording straight away. |
| Delete action (the bin) | Deletes the selected action, after asking you to confirm. It can’t be undone. |
The same things are in Image › Actions: Record Steps (⇧ ⌘ R), Run, New Action from History.
Recording an action#
- Open a photo that’s good for trying things on.
- Press + in the Actions tab bar and give the action a name, for example Nocturnes.
- From now on Procol is recording: an amber dot on the Actions tab reminds you. Choose the style, move the sliders, change the strength: each move becomes a step in the action. As in History, consecutive moves of the same slider become a single step.
- When you’ve finished, press ■ Done.
Procol records only the adjustments. It doesn’t record you, the screen or the camera.
The crop, the brush strokes and the retouched Portrait zones don’t go into actions: they belong to one photo only. If you use them while recording, a message reminds you.
The starting point#
The first step of a new action is the starting point: the complete state of the print at the moment you began, style and adjustments included. Thanks to it, the action gives the same result on any photo, whatever was there before.
If you untick the starting point, the action becomes relative: it applies only the changes you made afterwards, on top of the photo’s state at that moment. It’s useful for short actions such as ‘more grain and darker corners’, to add on top of any style.
Changing an action#
- Tap the arrow next to the name to show or hide its steps.
- The tick on a step leaves it out of the action without deleting it; the × deletes it.
- Double-click the name to rename it.
- To add steps to an existing action, select it and press Record: the new moves are added at the end.
From History to an action#
Often you only realise afterwards that the route you took on a photo is worth repeating. You don’t have to do it all again: in the History panel press the bookmark, or choose Image › Actions › New Action from History. Give it a name, and the active steps up to the current one become an action. The crop, the brush and the retouched zones stay with the photo.
Running an action#
Select the action and press ▶, or choose Image › Actions › Run. The steps are applied to the open photo and appear in History, one by one: you can switch them off or undo them like any others. If the action names one of your presets that you’ve since deleted, a message tells you which one is missing.
Apply to multiple files#
Apply to multiple files runs an action, or the open print’s settings, on a group of photographs, and saves all the prints together. It’s the job for when you come back from a trip with two hundred photos and a recipe in your head.
Open it with the two-sheets button in the Actions bar, or with File › Apply to Multiple Files… (⇧ ⌘ B). You need an action selected in the Actions tab: if there isn’t one, Procol opens the tab and asks you for one.
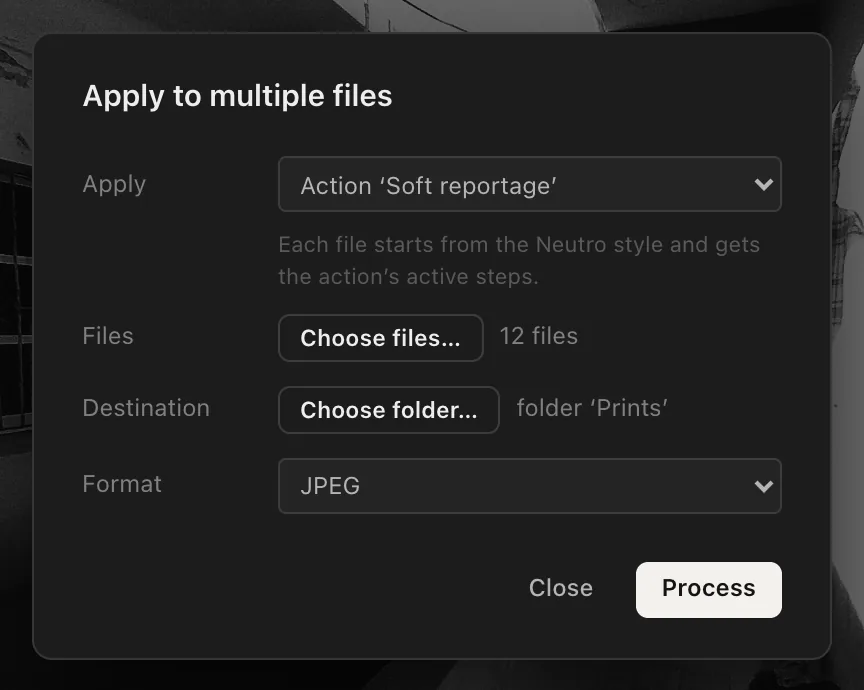
In the window:
- Apply:
- Action ‘…’: each file starts from the Neutro style and gets the active steps of the selected action;
- Current settings: each file gets the style in use with the open print’s current adjustments, strength included.
- Files: Choose files… and select the photographs, as many at once as you like. RAW files are fine too: each one is developed at full resolution before it’s printed.
- Destination: Choose folder… writes the prints straight into a folder on disk. This button is there only in browsers that allow it, such as Chrome and Edge; otherwise, and until you choose a folder, the prints go to the browser downloads.
- Crop: appears only if the open photo is cropped. Turn it on to apply the same crop, in the same proportions, to all the photos: useful for a series to be laid out square.
- Format: JPEG or PNGJPEG, PNG or TIFF.
Press Process. A bar shows the progress, file by file. At the end Procol tells you how many prints it made and which files, if any, it couldn’t open.
Each print carries the photo’s name followed by the style’s tag, for example IMG_2041_cartier-bresson.jpg. The prints are worked out at each photo’s full resolution. Without a licence they come out with the watermark, like those from the Export window (see Licence and privacy).Without a subscription they come out with the watermark, like those from the Export window (see Procol for Mac).