Working and output
Exporting and printing
How to export your print from Procol: JPEG, PNG or TIFF, quality, size, dpi at the print size, file name and where to save it; tips for the lab and for printing at home.
As long as it stays in Procol, your print is a recipe laid on a photograph. Exporting means taking it out: Procol works the whole thing again, at the photograph’s full resolution, and makes a file you can put online, send to the lab or keep.
The Export window#
Choose File › Export… (⌘ E). The item is available whenever a photo is open.
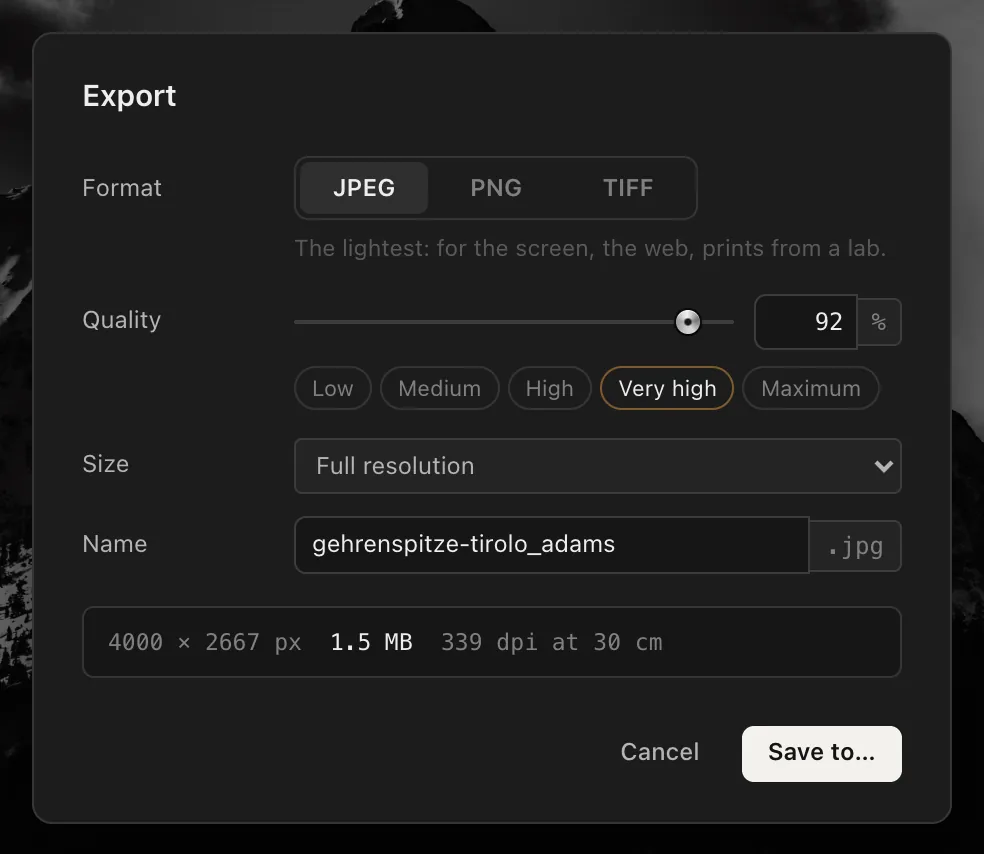
From top to bottom:
Format#
| Format | When to choose it |
|---|---|
| JPEG | The lightest: for the screen, the web, prints from a lab. It’s the right choice nearly every time. |
| PNG | Lossless, but heavy: for the archive and for retouching in another program. |
| TIFF | Lossless, uncompressed, with the print’s dpi written into the file: for the lab that asks for it, and for layout. |
All three formats are 8 bits per channel, RGB.
Quality (JPEG only)#
JPEG quality runs from 1 to 100. Drag the slider, type the number in the box, or use the quick choices: Low (30), Medium (60), High (80), Very high (90), Maximum (100).
Procol starts you at 92: for a black-and-white print it’s a good meeting point between file size and quality, and the grain comes through untouched. Go down towards 80 for the web; go up to 100 only for the fussiest lab. At low quality JPEG smears the finest detail, and grain is the first thing to suffer.
Size#
- Full resolution: the size of the original photo, crop included. This is the one to print from.
- Long side 4096, 3000, 2048 or 1600 px: smaller versions, for the web or to show a client. The 1600 is marked web. Only the sizes smaller than your photo appear.
Grain belongs to the negative, not to the pixels: in a smaller version it shrinks with the photo, as it would in a smaller print from the same negative. That’s why a 1600 px export shows finer grain than you see at 100%.
Name#
Procol suggests the photo’s name followed by the style’s short name, for example montagna_adams. Change it as you like: the extension (.jpg, .png, .tif) is added for you.
The measurements line#
Below the name, one line tells you what you’re about to save:
- the pixels of the print, for example 6000 × 4000 px;
- the file size, worked out again every time you change format, quality or size;
- the dpi at the chosen print size, for example 508 dpi at 30 cm.
Format, quality and size are remembered for next time.
Dpi and print size#
Dpi isn’t a quality of the file: it says how many pixels land on each inch of paper, and that depends on how big you print. Procol works it out from the print size chosen in 2 · Film, in the grain group: the same print size Procol uses to judge how visible the grain is. Change the print size, and the dpi in the Export window changes with it.
A few landmarks, to adjust to your own lab:
- around 300 dpi: a print to look at close up, in the hand or in a book;
- 150–200 dpi: a big print, to look at from a few paces, on the wall;
- below 150 dpi: better to print smaller, or accept a softer print.
Only TIFF carries the dpi written inside the file. With JPEG and PNG, you or the lab decide the size when it comes to printing.
Saving the file#
Press Save to…. What happens next depends on the browser:
- in Chrome and Edge the system window opens so you can choose a folder and a name, as in any app;
- where the browser can’t do that but can share, on iPad for example, the share sheet opens: choose Save to Files, or send it straight to another app;
- everywhere else the button is called Download and the file goes to the browser’s downloads.
Press Save to…: the macOS save window opens, so you can choose a folder and a name.
A message at the bottom confirms the file name and its size. Cancel closes the window without saving.
What goes into the exported print#
Everything you see, worked out again at full resolution:
- the style, its strength and every adjustment in the Stages;
- the masks and the brush strokes, redone at the export resolution;
- the crop and the rotation from Crop;
- the grain, made for the whole photo: the same grains, in the same places, that you see in the preview at 100% and in the proofs.
It isn’t a copy of the preview: that’s why exporting a big photo takes a few seconds.
Very large photos#
Procol works the print out on the graphics card, which has a limit on image size: around 16,000 pixels on a side on many computers, less on some. If your photo goes over it, Procol scales it down as far as it needs to and writes (GPU limit) next to the pixels. If the export fails, a message appears: try a smaller size.
If the export fails, a message appears: try a smaller size.
Printing#
Procol doesn’t send the print straight to the printer: you export the file and print it from the program you normally use, or send it to the lab. A few tips:
- Before you export, look at the print at its real size. View › Actual Print Size shows it on screen at the chosen print size, to be looked at from about 35 cm: it’s the best way to decide whether the grain is right. See Seeing and checking.
- Judge the tones on a neutral surround. In View › Surround choose 18% Grey or Paper White: black around the print makes it look lighter than it will come out.Judge the tones with care. Black around the print makes it look lighter than it will come out.
- For the lab, export at full resolution, as a JPEG at quality 90–100 or as a TIFF, and ask for a print with no automatic corrections: you’ve already done the work on the tones.
- Deep shadows are the first to block up on paper. If they print too dark, try the Zones view to see how much of the picture falls on Zones 0 and I.
Exporting many photos at once#
To export a whole series with the same recipe, use File › Apply to Multiple Files… (⇧ ⌘ B): it’s explained in Working in order.