Tools
Viewing and checking
Procol’s tools for looking at the print and testing it: Compare, Original, zoom and 100%, Zones, Proofs, Brush, Spot meter and Test strip.
In the darkroom you spend as long looking as you do exposing: the test strip under the white light, the wet print next to yesterday’s, the loupe on the grain. This chapter gathers Procol’s tools for looking, measuring and testing.
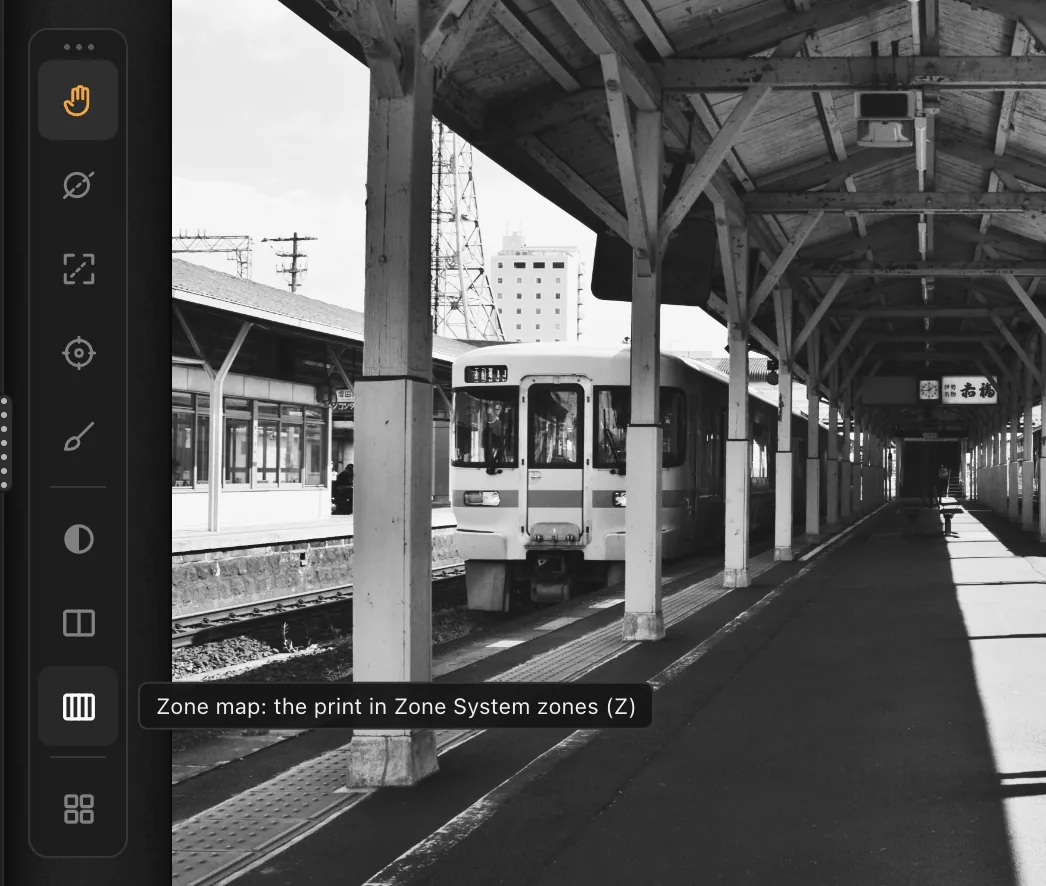
Nearly all of them sit in the tool strip to the left of the print. From the top:
| Button | Key | What it is |
|---|---|---|
| Hand | H | The resting state: moves the enlarged photo around. |
| Masks | M | Burning and dodging: see Masks. |
| Crop | R | Cropping and straightening: see Crop. |
| Meter | E | The Zone System spot meter. |
| Brush | B | Burn, dodge, contrast and smudge, freehand. |
| Original | Space | The photo you started from, for as long as you hold it down. |
| Compare | C | Original and print side by side. |
| Zones | Z | The print divided into zones. |
| Proofs | P | Four prints from the same negative. |
Each button’s name appears when you hold the pointer over it. The same commands are in the Darkroom and View menus. One tool is on at a time: choosing another switches the last one off, and tapping the one that’s on again goes back to the Hand.
Esc closes one layer at a time: first menus and windows, then proofs, test strip and the active tool (back to the Hand), then zones, compare and 100%.
Compare#
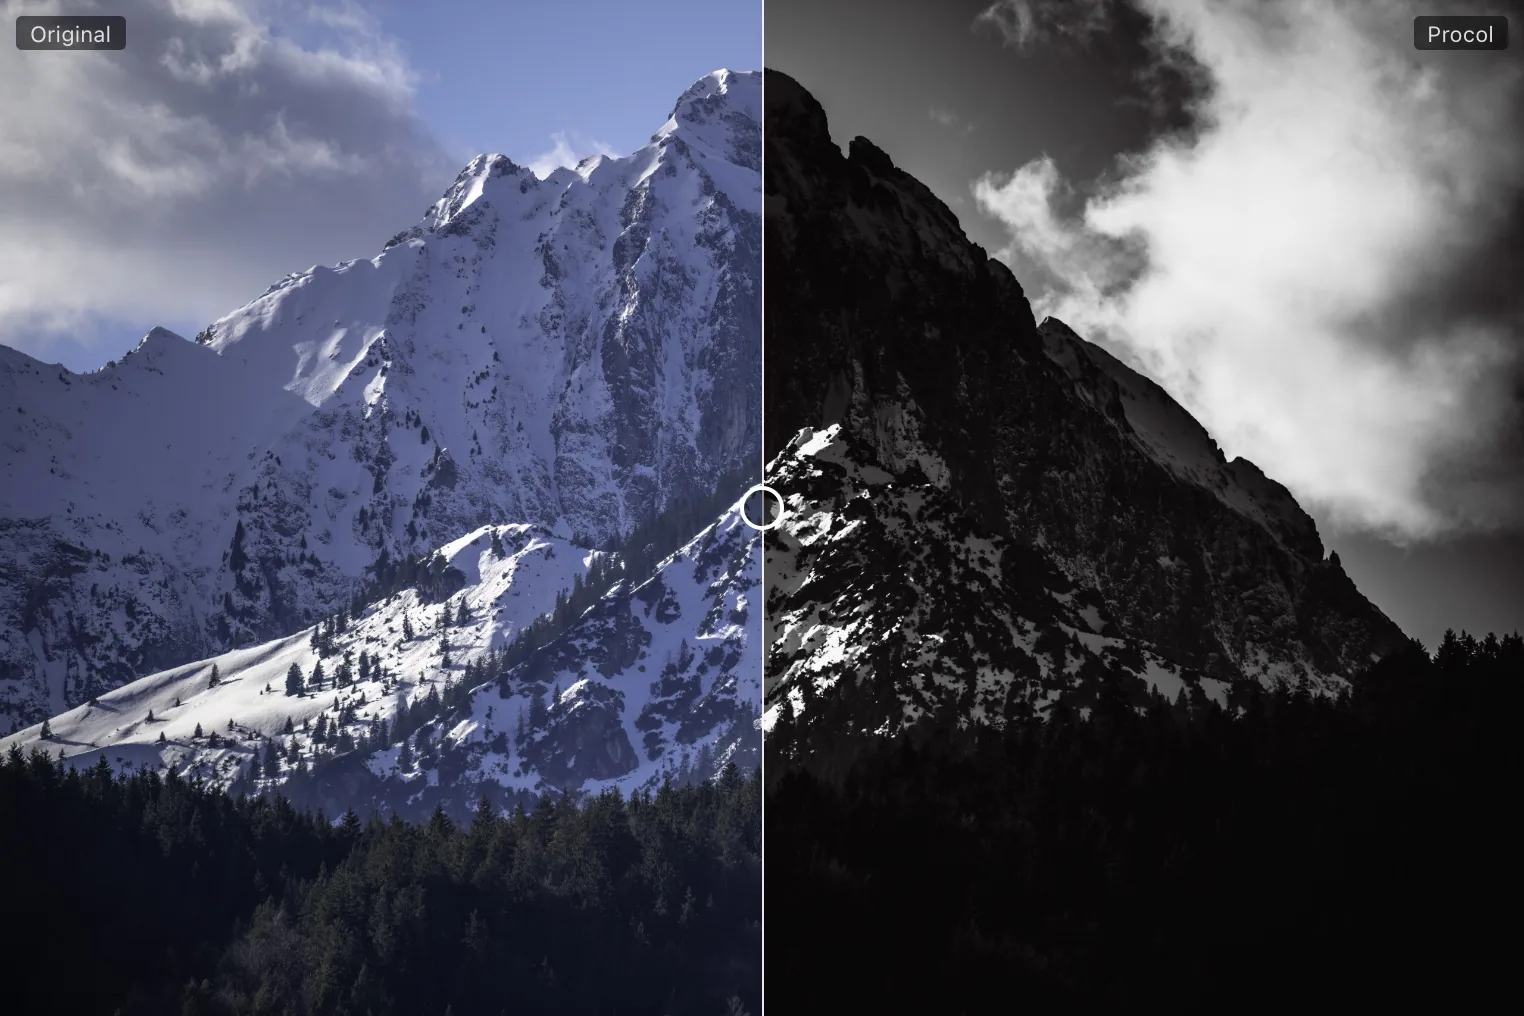
Compare splits the view: the Original on the left, the Procol print on the right, each with its label.
- Open it with the Compare button, with View › Compare or with C.
- Drag the line (or its round handle) to move the divide. It works with a mouse or a finger.
- Compare works at any magnification: at 100% you can put the divide right on a detail.
Original#
Hold down the Original button, or the Space bar, to see the photo you started from; let go and the print comes back. It’s the quickest way to ask yourself ‘better, or worse?’.
From the menu, View › Original (Press and Hold) keeps the original up until you choose the same item again: handy on a touch screen, where holding down and looking at the same time is awkward.
Zoom and 100%#
Judging grain in the full view is like judging it from three metres away. Procol lets you come closer.
The magnifier in the status bar, bottom right, shows the current magnification (‘Fit · 49%’). Tap it to go from Fit to 100% and back. 100% shows one pixel of the photo per pixel of the screen: the only honest way to judge grain.
- Mouse wheel over the print: each click zooms in or out by a quarter, around the point under the pointer, from Fit up to 800%. Passing Fit and 100%, the zoom pauses there for a moment.
- Trackpad: two-finger scrolling while holding ⌥, or a pinch, zooms continuously. Without ⌥ scrolling does nothing, so zooming and moving don’t get mixed up. Clicking on the photo never zooms.
- With your fingers: two fingers spread or pinch around the point between them; one finger moves the enlarged photo.
- To move around the enlarged photo, drag with the Hand.
- Menus: View › Zoom In (⌘ +), Zoom Out (⌘ −), Fit to Window (⌘ 0, or 0), View at 100% to Judge the Grain (1).
Past 100% Procol renders only the visible part, at screen resolution: the photo enlarges softly, as under the enlarger, and the grain stays sharp, as in a bigger print. These aren’t the preview’s pixels blown up. Masks, Crop, zones and compare work at every magnification.
Actual size#
View › Actual Print Size, or the Actual size button in Stage 2 · Film, shows the print at the chosen size (24×30 cm, 40×50 cm…) at its real dimensions on screen, to be looked at from about 35 cm. The size is the browser’s nominal one: on laptops with a very dense screen the print looks a little smaller. See also 2 · Film.
Surround#
View › Surround chooses what lies around the print: Dark, 18% Grey or Paper White. The surround fools the eye: on black a print looks lighter, on white it looks darker. For judging tones, 18% Grey is the most neutral; Paper White is like a window mount.
Zones#
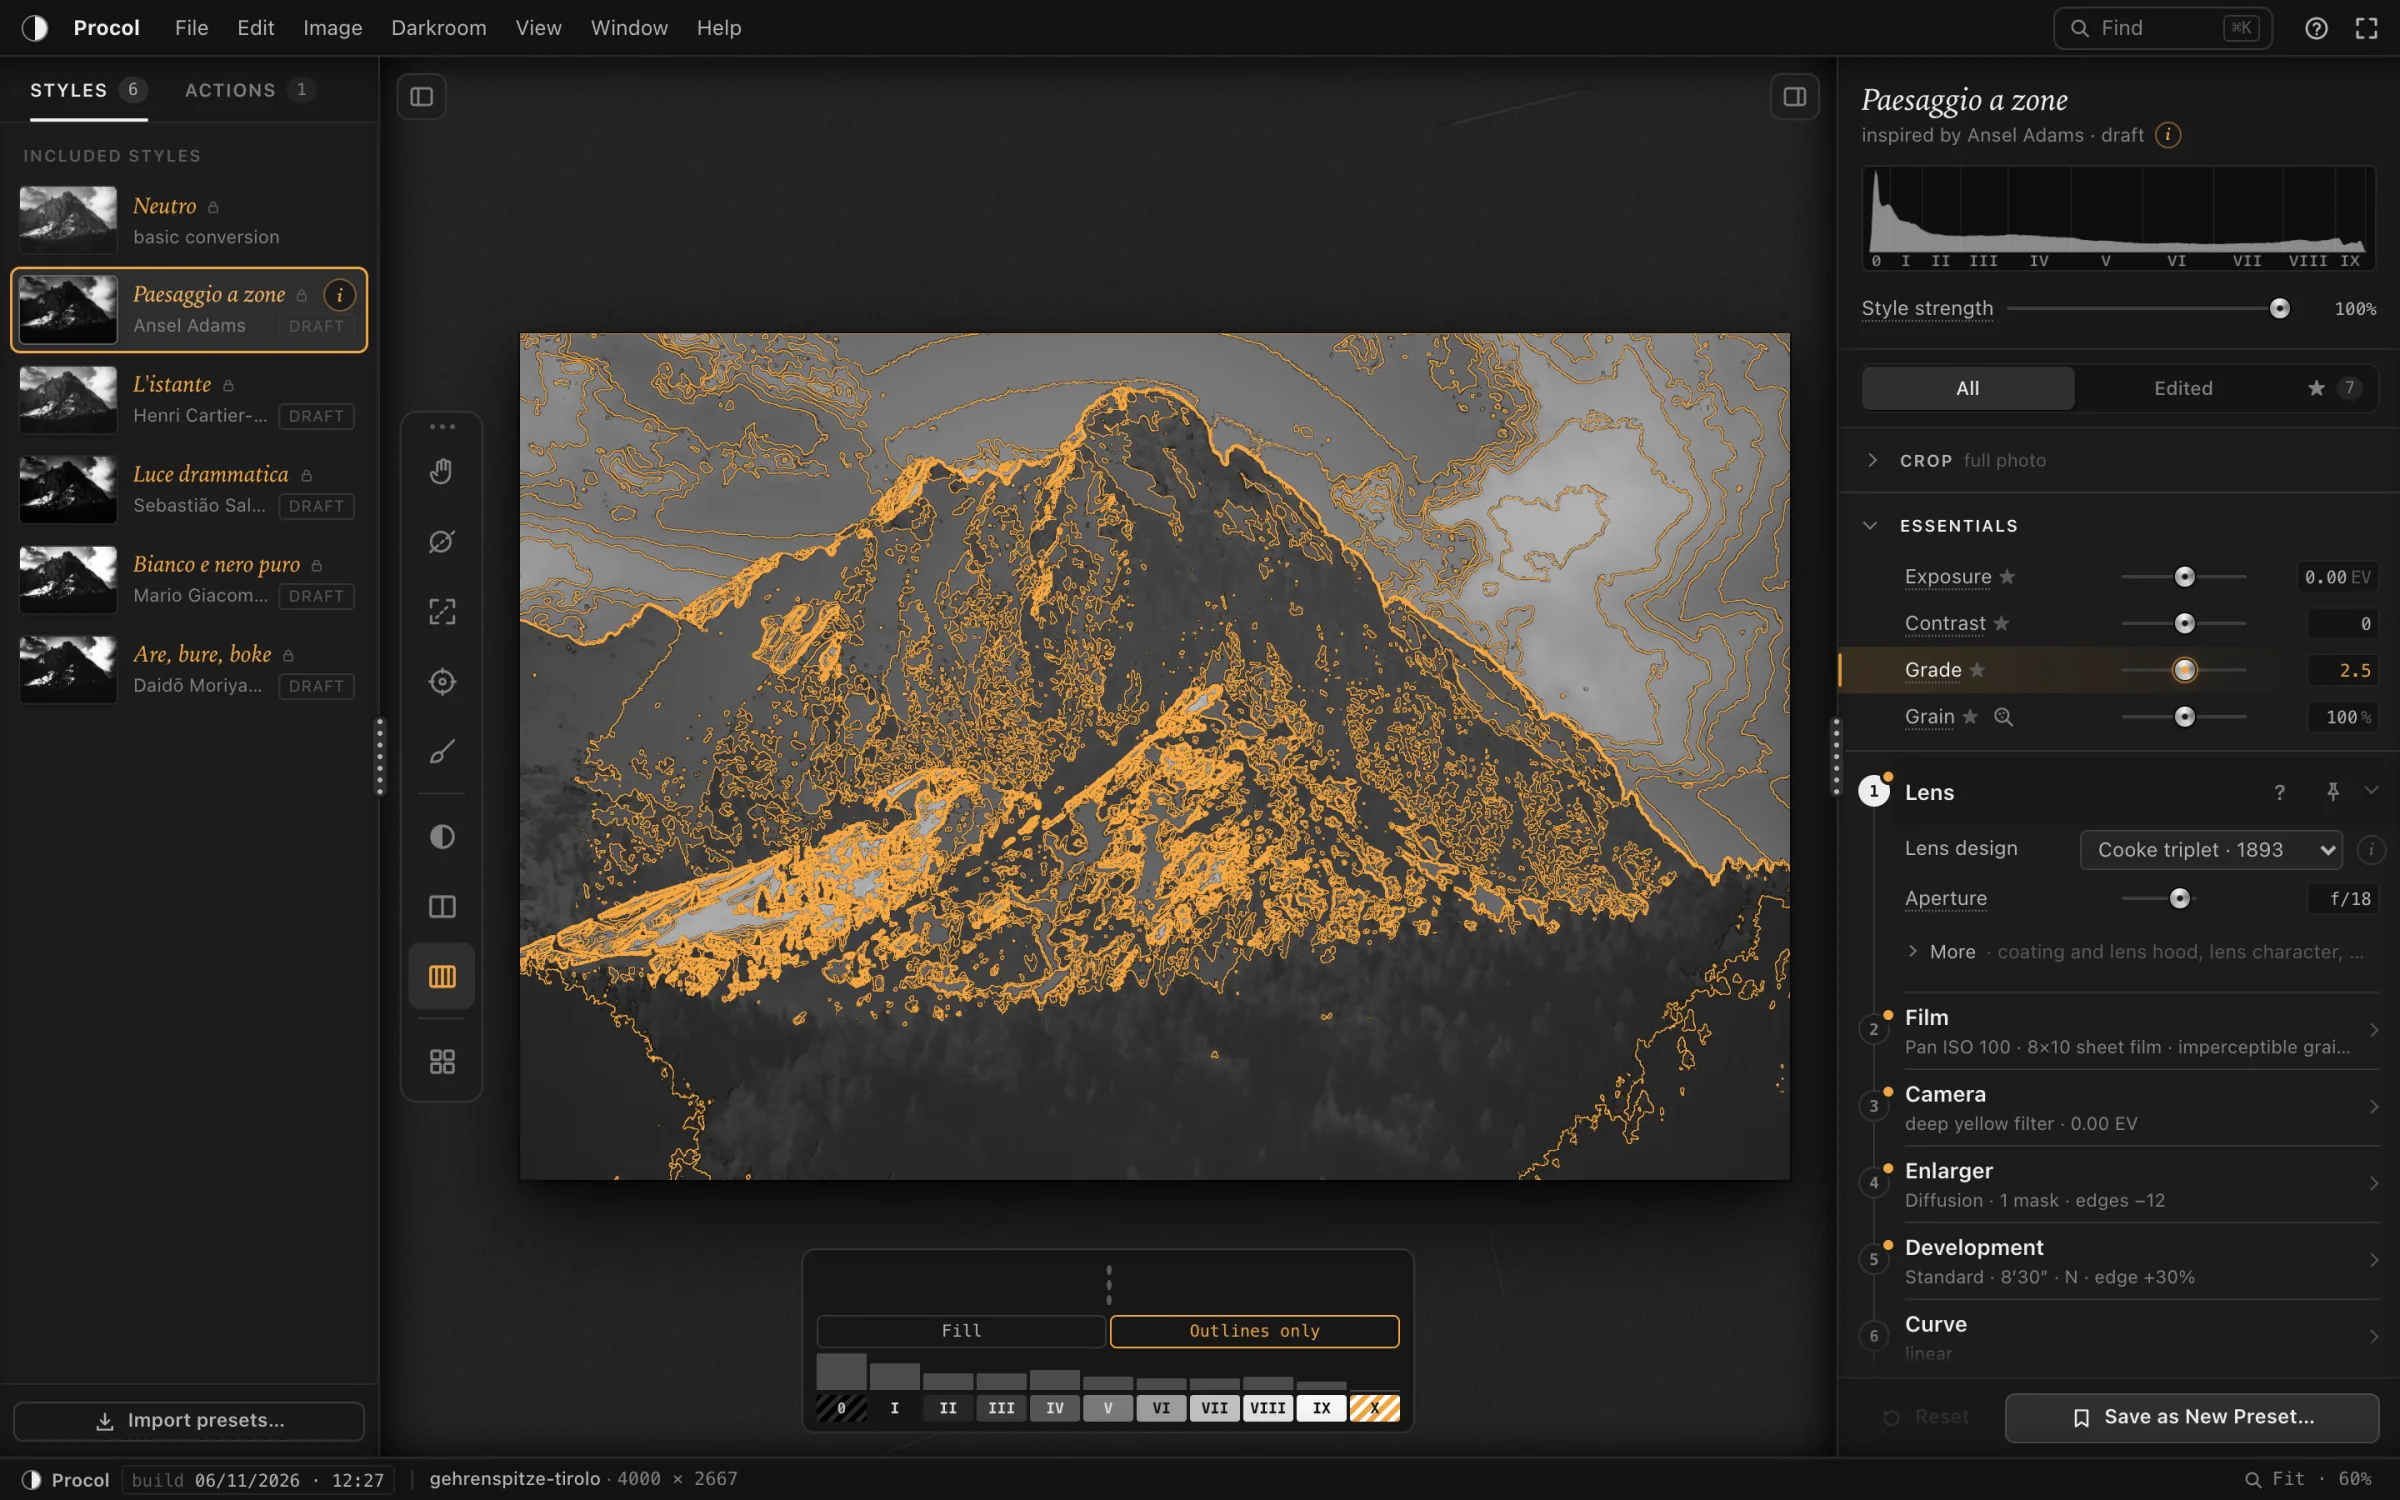
Zones shows the print divided into the zones of the Zone System, read from the density of the paper. Along the bottom appears the zone scale, with the share of the print in each zone.
- Open it with the Zones button, with View › Zones or with Z.
- Fill: each zone painted in its own grey.
- Outlines only: the borders between zones become amber lines over the dimmed print, like the contour lines on a map.
- Closed-up black (Zone 0) is a dark hatching, paper white (Zone X) an amber hatching: there’s no detail there.
- Tap a zone on the scale to pick it out in amber on the print; a message tells you how much of the print it takes up (‘Zone III: 12.4% of the print’). Tap it again to see them all.
- The Inspector’s histogram is divided into zones too, with Roman numerals.
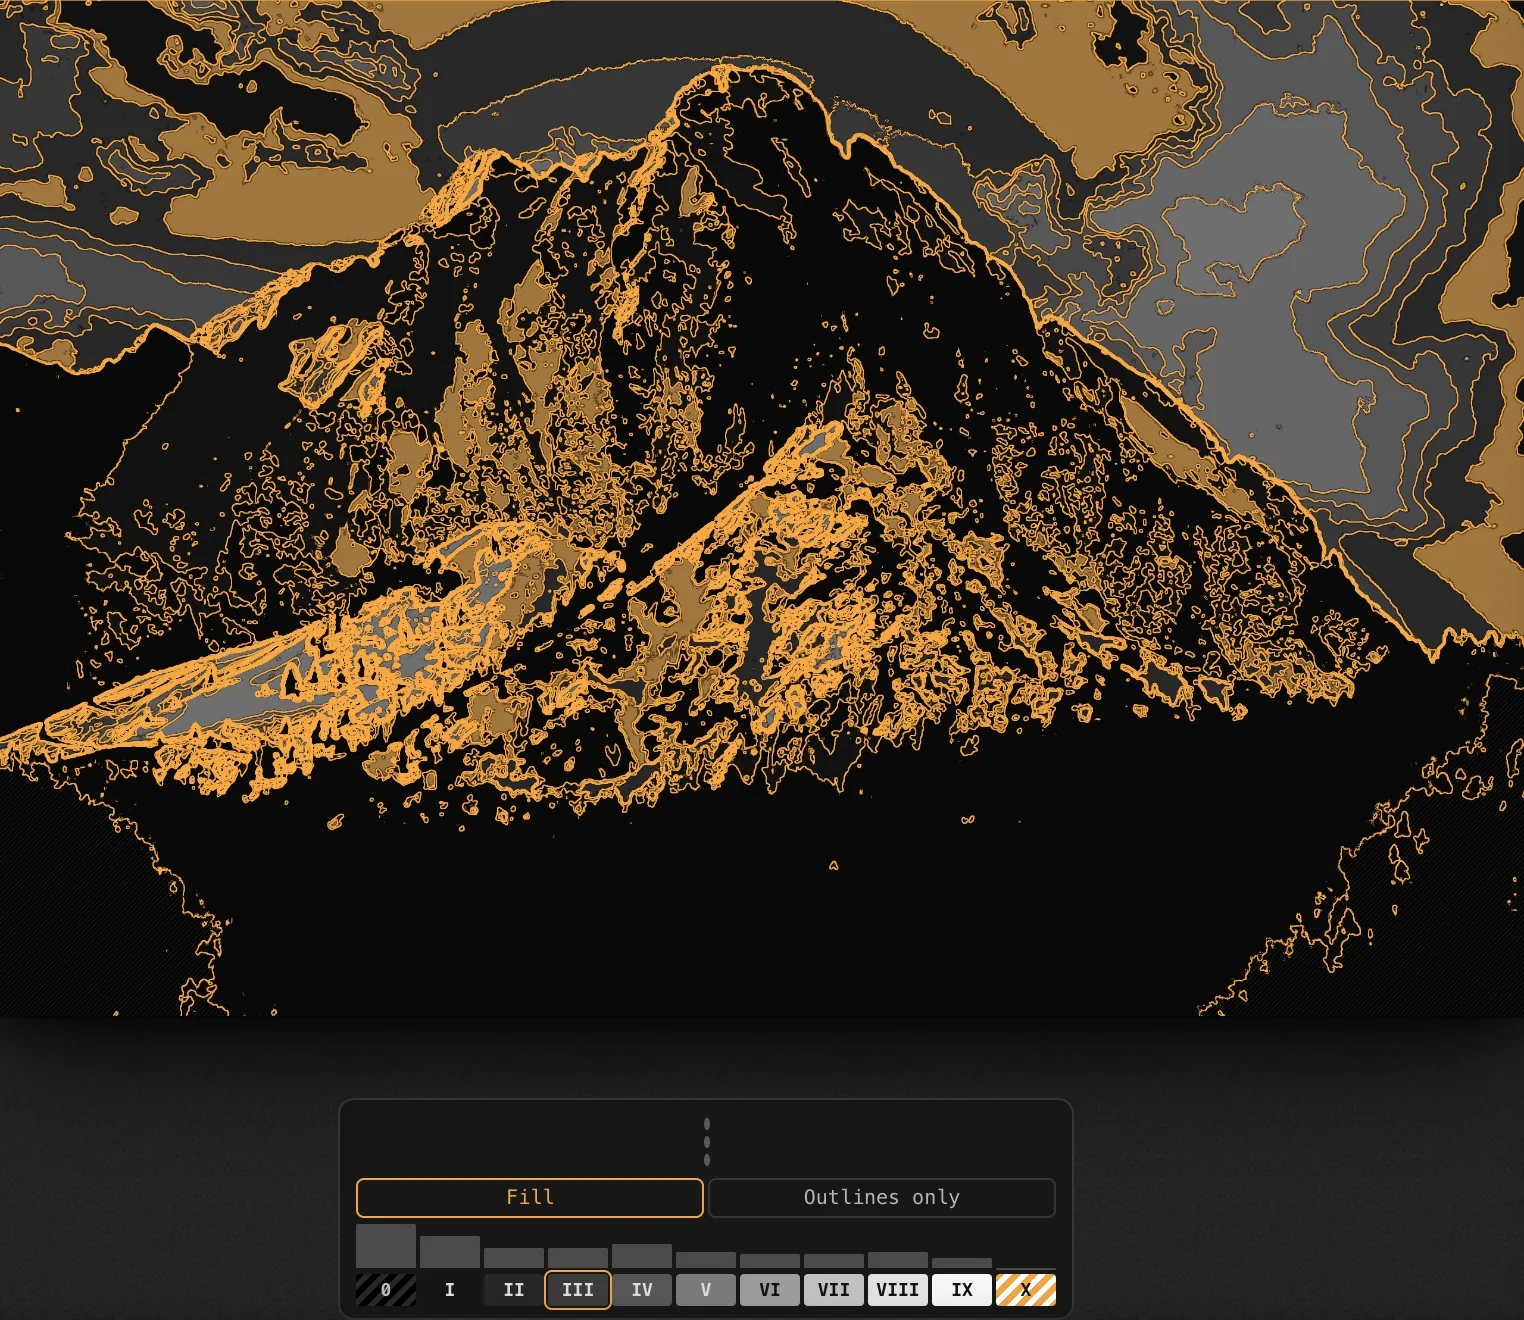
| Zone | What you find there |
|---|---|
| 0 | The paper’s solid black, no detail. |
| I | Nearly black: the first tone you can just tell apart. |
| II | The first hints of texture in the deep shadows. |
| III | Shadows with full detail: dark fabrics, bark. This is where you ‘place’ the important shadow. |
| IV | Open shadows: dark foliage, dark stone, shadow on a face. |
| V | Middle grey (18%): north sky, grey wood, dark skin. |
| VI | Light skin in the light, concrete, shadow on snow. |
| VII | Very light skin, light fabrics: highlights with full texture. |
| VIII | Whites with texture: snow with detail, white paper. |
| IX | White with almost no texture: snow in flat sunlight. |
| X | Paper white: glints and light sources. |
Each zone is one stop of exposure, all the way along the scale (0.3 in log exposure). The density this gives on the print depends on the paper’s curve: to read the zones, Procol uses reference densities, with steps of about 0.3 from V down to black and ever narrower steps from V up to white, where the paper runs into its toe. A ‘full’ print usually runs from a few points in Zone I up to VIII–IX.
How to use it. Before you save, switch Zones on: if the sky has ended up in X or the foreground shadows in 0, you know where to work (a mask, the grade, the print exposure).
Proofs#
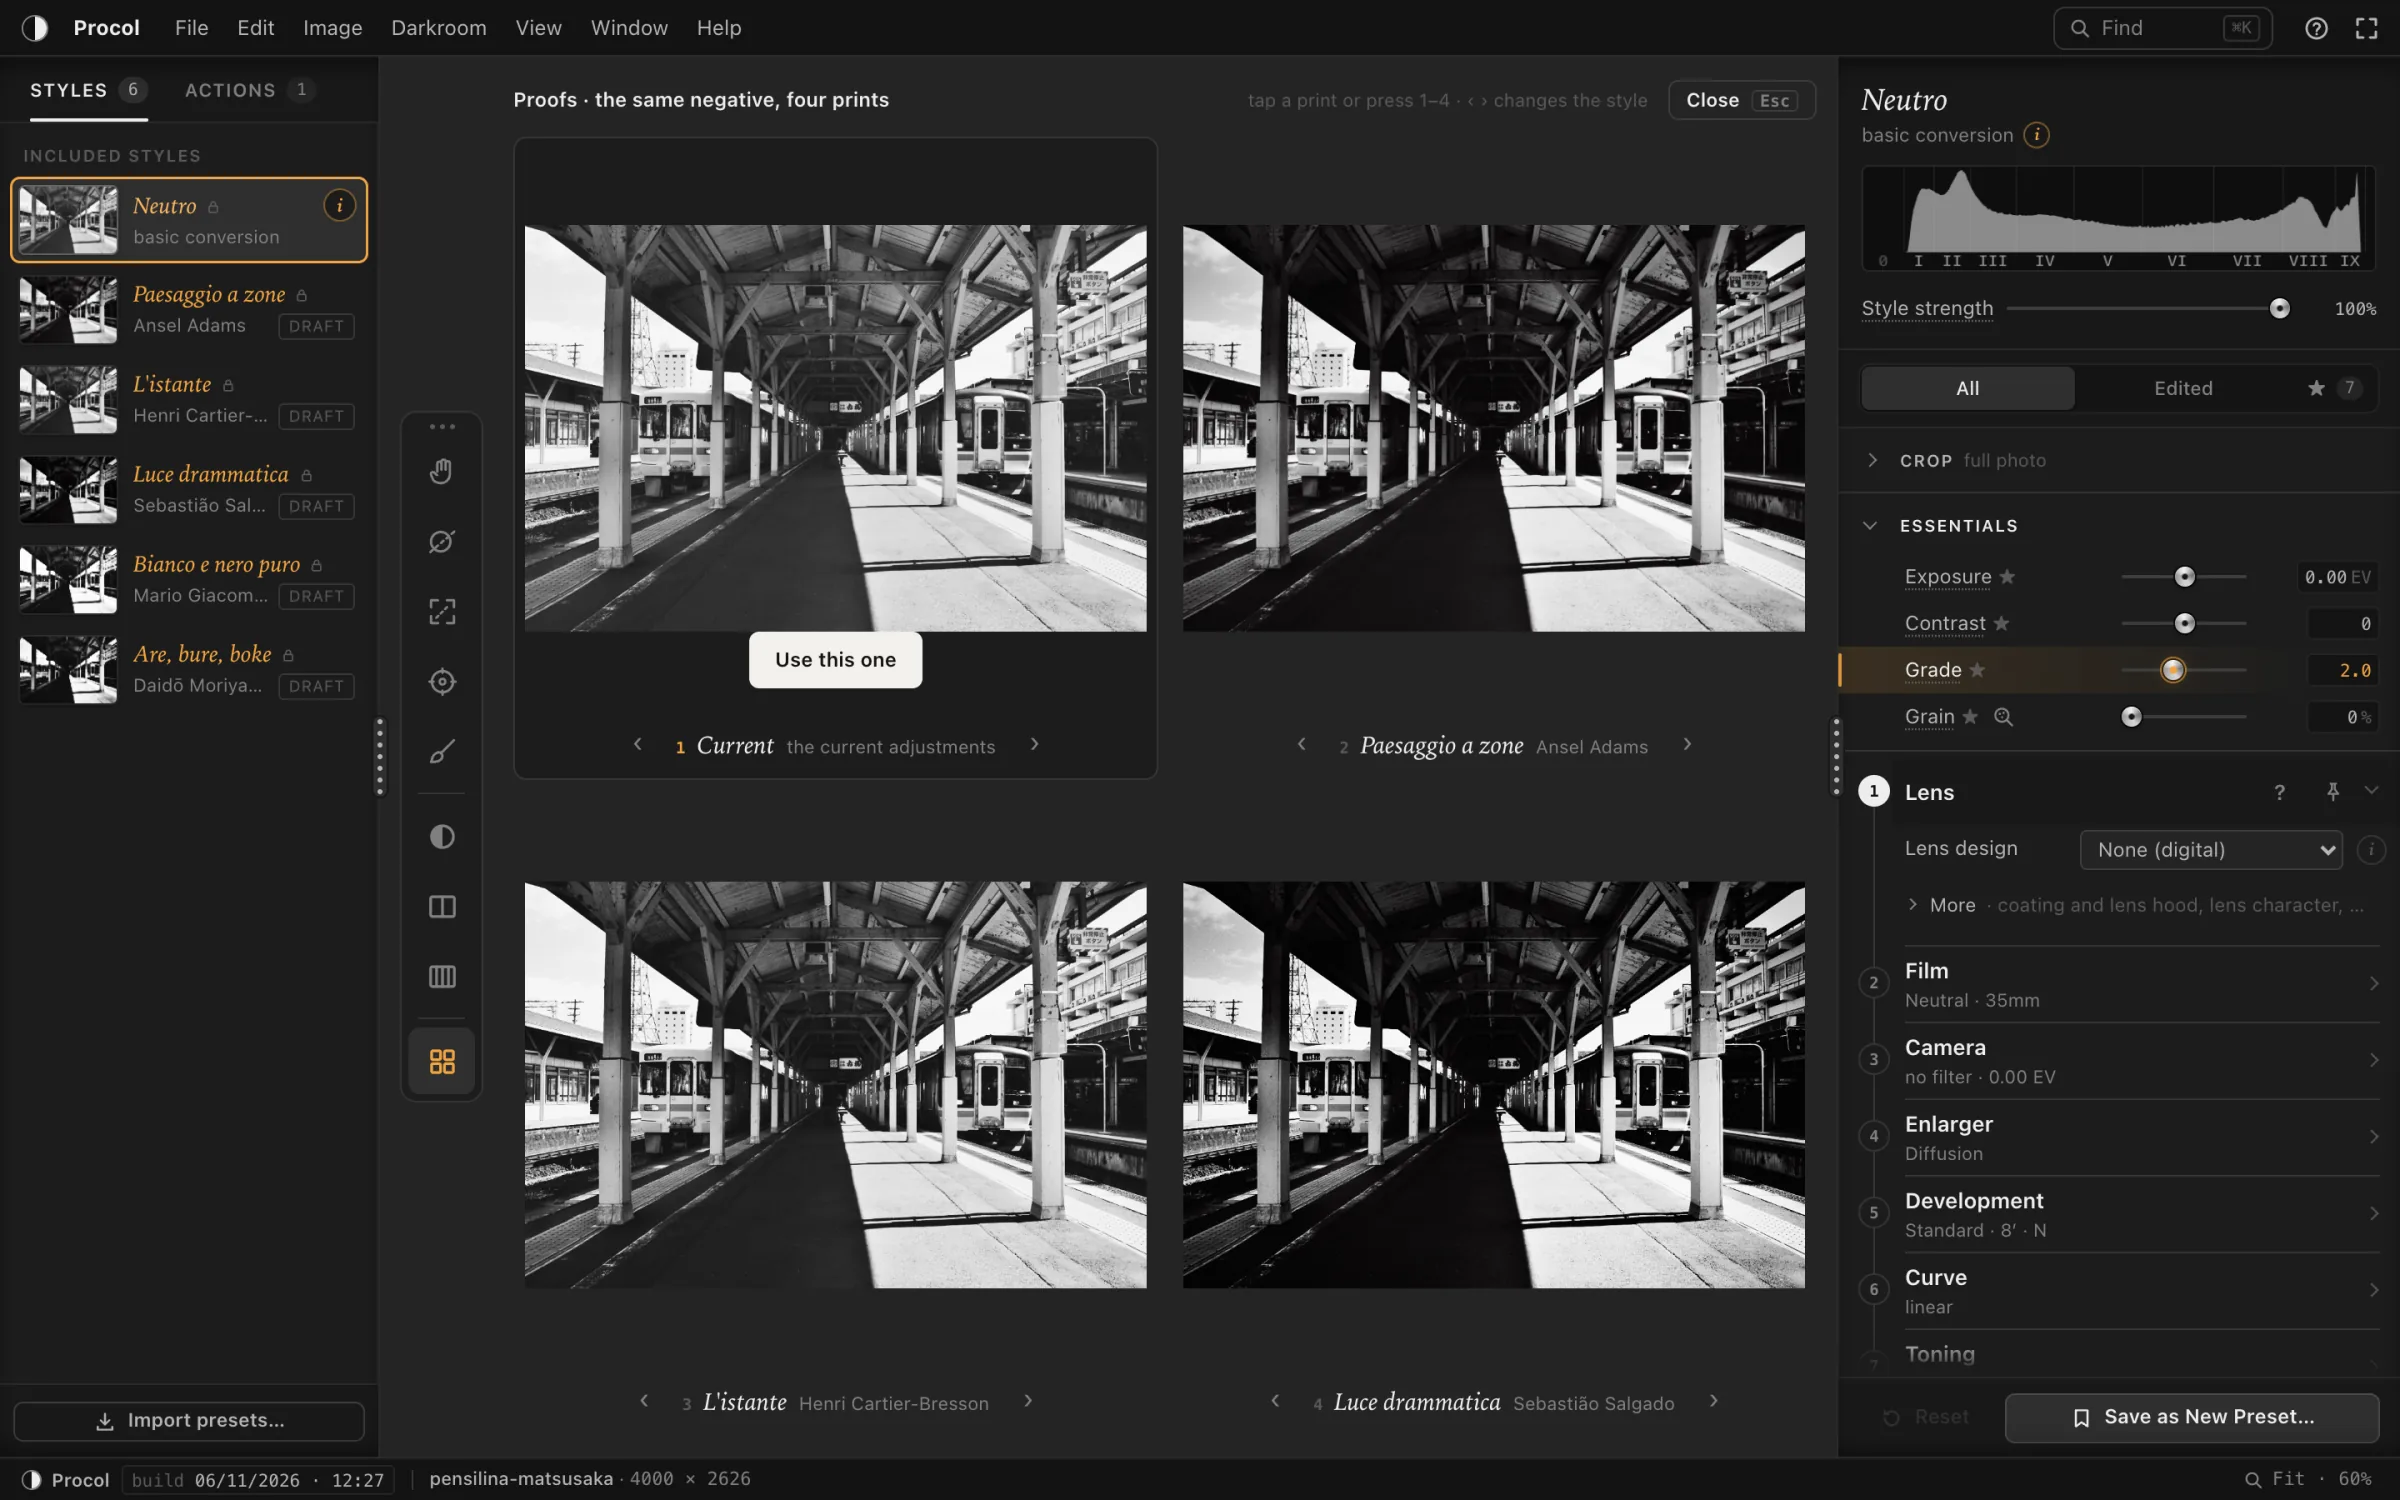
Proofs puts four prints from the same negative side by side, like proofs from one roll printed in different ways.
- Open it with the Proofs button, with View › Proofs or with P.
- The first print is Current, with your adjustments; the other three are the photographers’ styles that come with Procol.
- ‹ › under each print change that print’s style (your own presets too).
- Tap a print to choose it, or press 1…4.
- Use this one on the print (or ↵ for the chosen one) takes on that style and closes the proofs.
- Close (or Esc) closes without changing anything.
The proofs use the open photo’s crop, brush strokes and detected face. They are small prints: to judge the grain, choose the style and then look at 100%.
Brush#
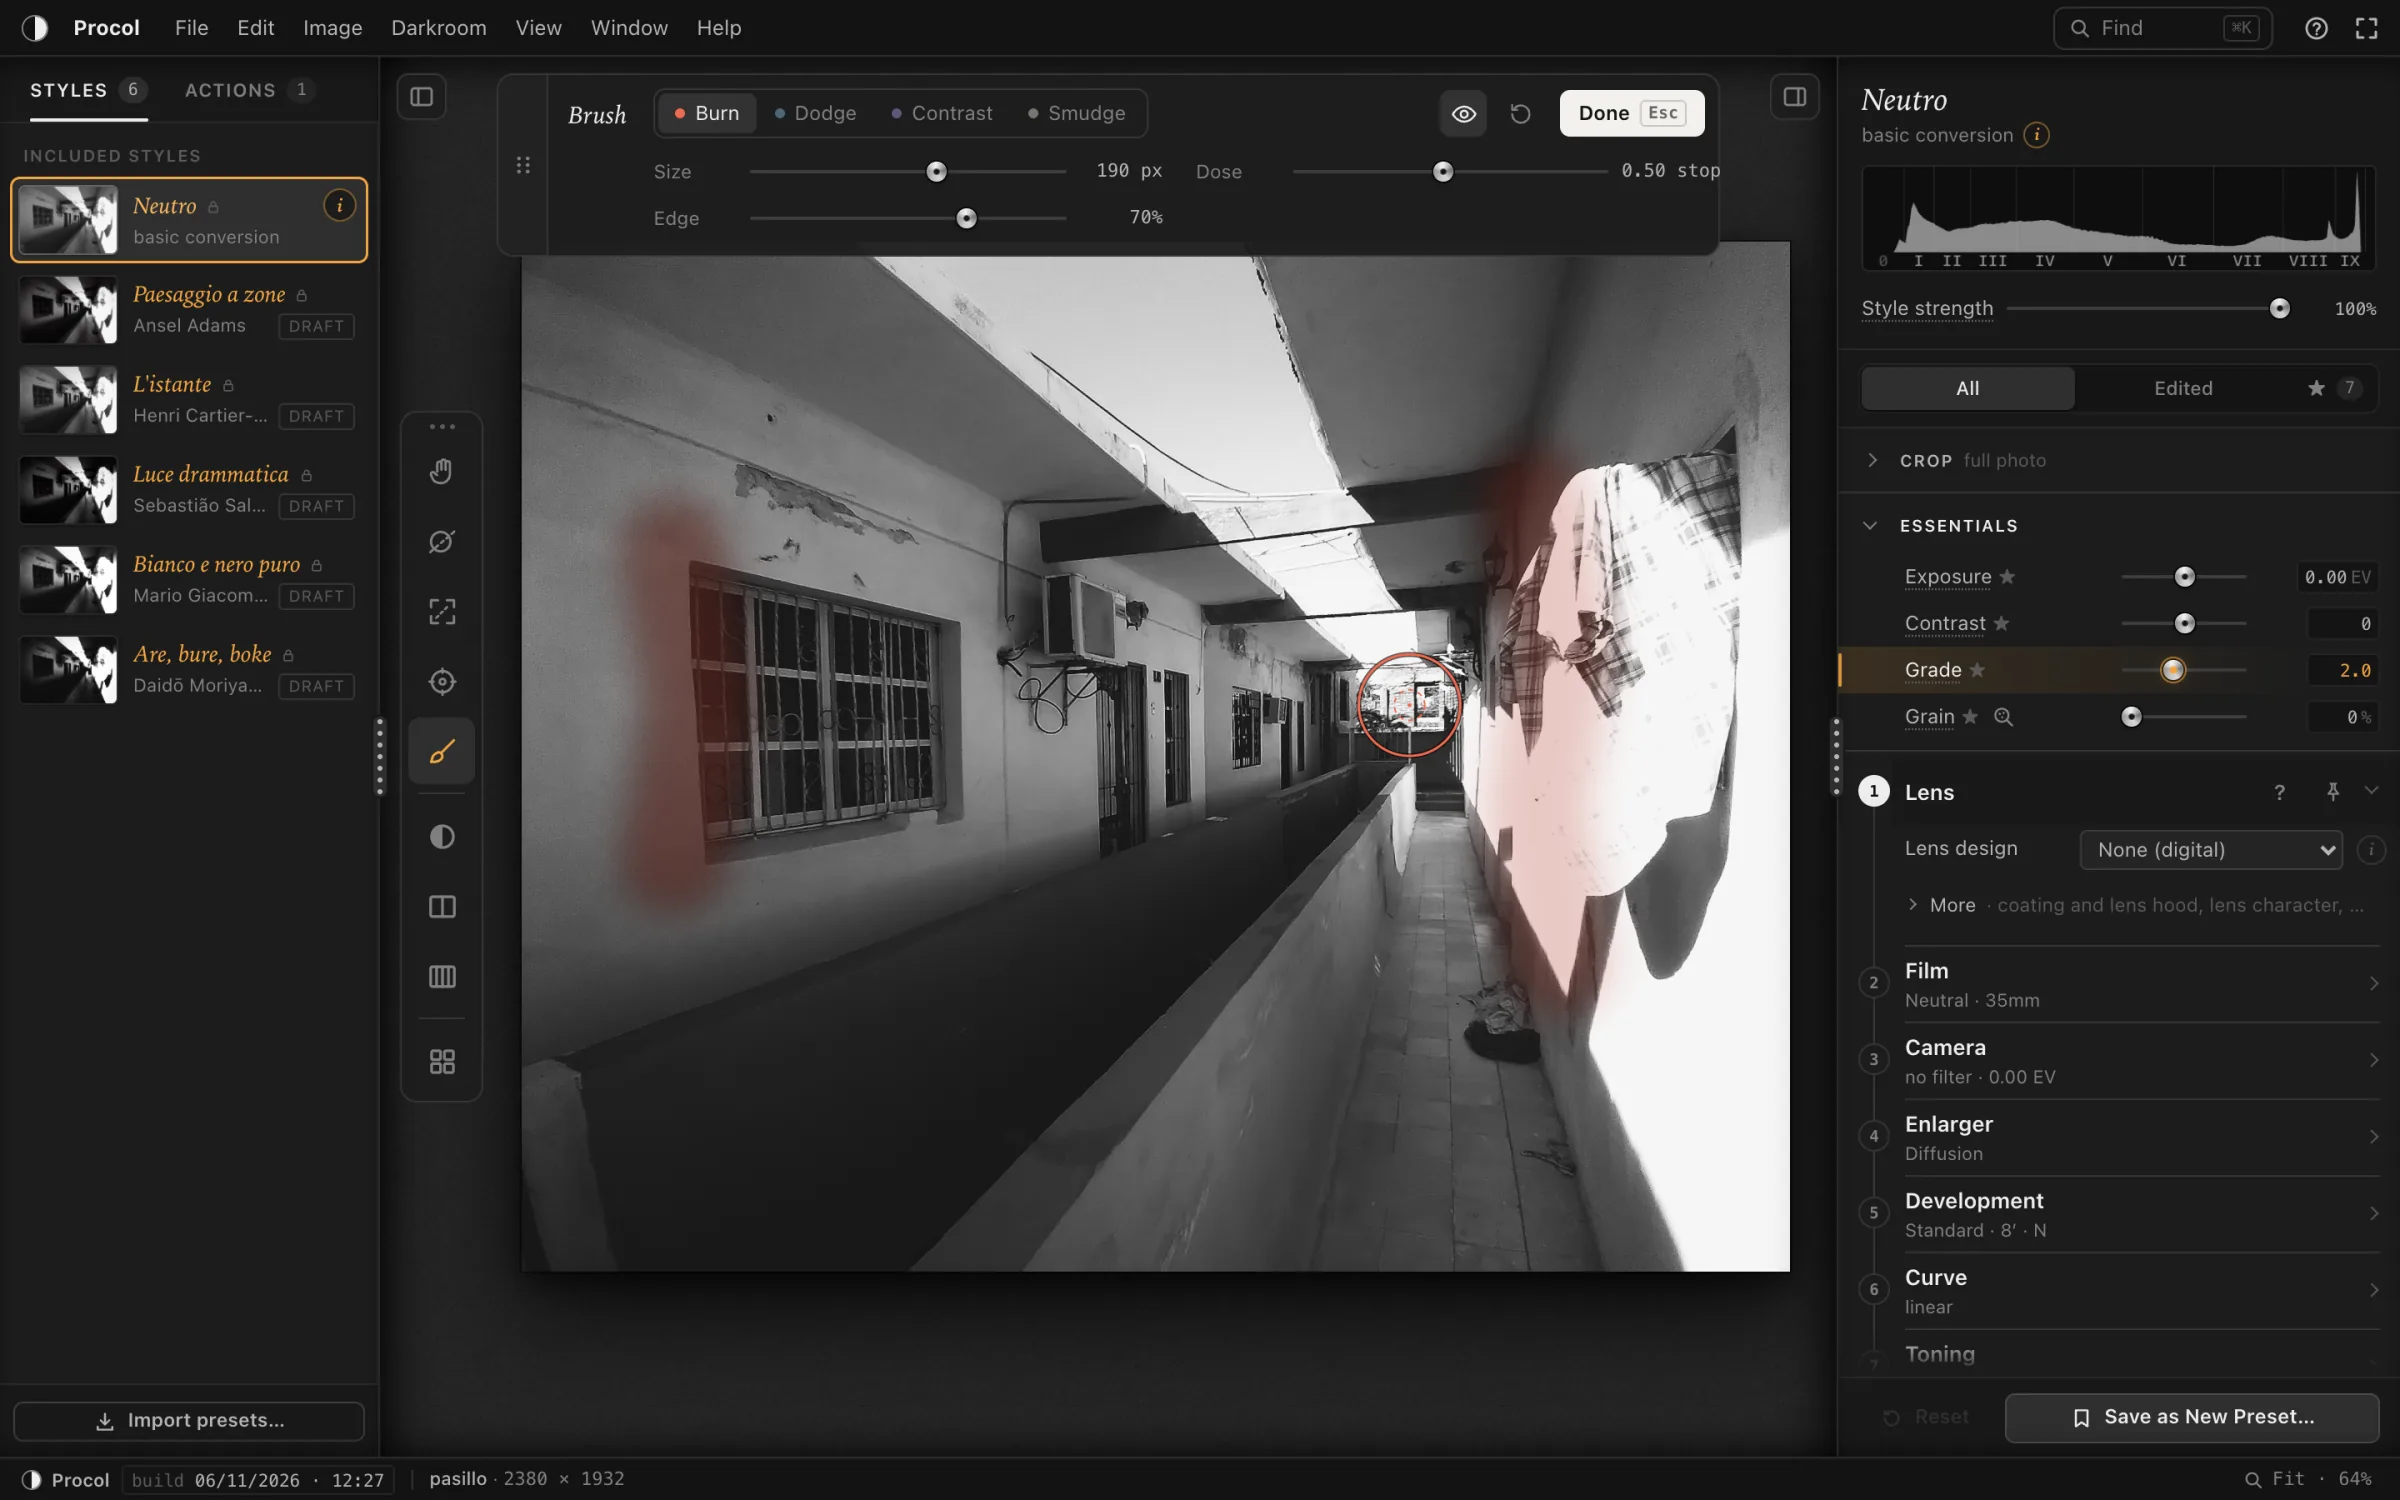
The Brush is the printer’s hand under the enlarger: it burns and dodges freehand, following the outlines a geometric mask can’t follow.
Open it with the Brush button in the strip on the left, with Darkroom › Brush or with B. The Brush bar appears at the top of the photo.
The four moves#
| Move | What it does |
|---|---|
| Burn | More light under the enlarger: the area goes darker. |
| Dodge | Less light: the area goes lighter. |
| Contrast | A harder grade only where you pass. |
| Smudge | Drags the tone along the stroke, like a finger on charcoal. |
While you paint, ⌥ switches from Burn to Dodge and back: the brush circle changes colour at once.
The settings#
- Size: the brush diameter, in photo pixels. Also [ and ].
- Dose (for Burn and Dodge): how much each pass gives, in stops, from 0.05 to 1 stop. Passes add up, like going over it again with your hand: a quarter stop gone over four times makes one stop, up to a maximum of three. For Contrast and Smudge the same row is called Strength.
- Edge: how soft the edge is, from 0% (hard) to 100% (feathered, like a hand moving under the light). The dashed circle shows where the effect is full.
The buttons#
- Show (the eye): veils the painted areas on the photo, burned in red, dodged in blue, contrast in purple.
- Clear: removes every brush stroke from this photo. It can still be undone.
- Done (or Esc): back to the Hand. The strokes stay.
If the bar covers the part you’re working on, you can drag it elsewhere on the photo by its grip.
Graphics tablet#
When the pen of a graphics tablet hovers over the photo, Pen appears in the bar, with the pressure of the moment. You choose what pressure controls: the Dose (the harder you press, the more light you give or hold back), the Size (the harder you press, the wider the brush), or Off. The pen’s eraser inverts, like ⌥. While the pen is painting, a palm resting on the tablet doesn’t count.
The strokes belong to the photo#
Every stroke is a step in History (Edit › Undo, ⌘ Z). The strokes belong to this photo: they don’t go into styles or actions, and the export redraws them at full resolution.
Spot meter#
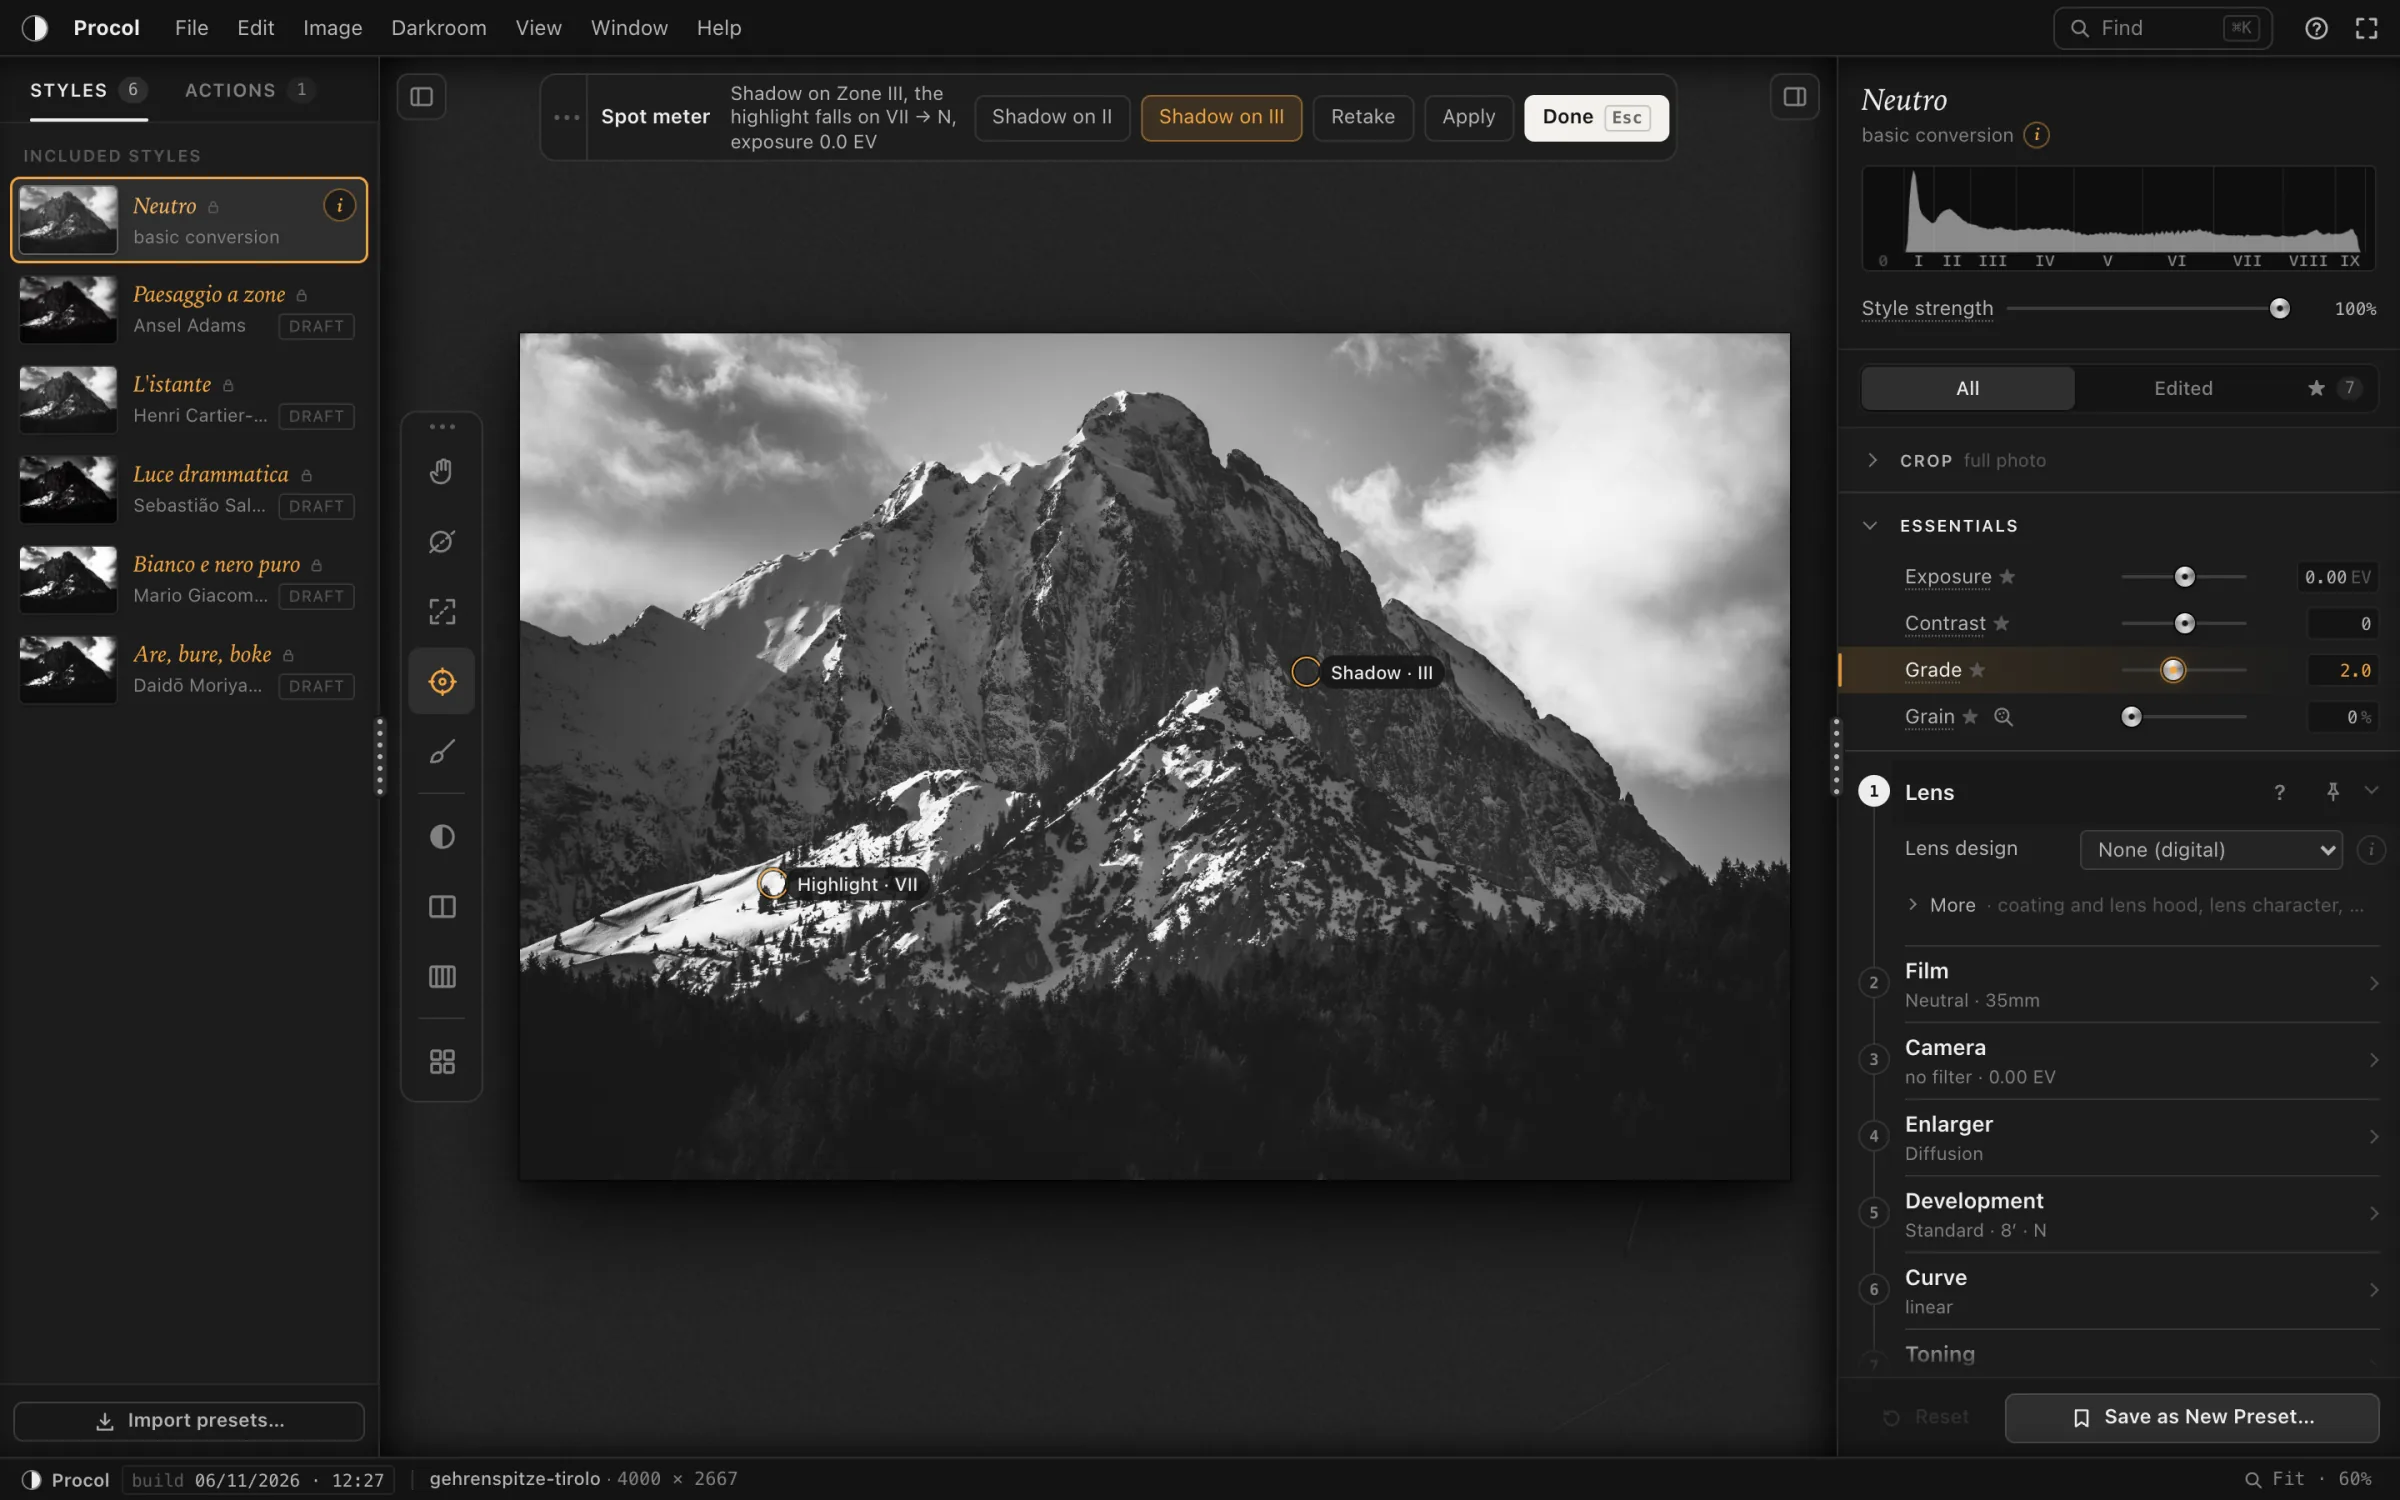
The Spot meter is the Zone System spot meter, on the photo. You read the shadow and the highlight; Procol tells you where they fall and suggests exposure and development.
Open it with the Meter button in the strip on the left, with Darkroom › Spot Meter or with E. The Spot meter bar appears at the top.
- Tap the darkest shadow that must hold detail: the bark, not the black hole between the trees.
- Tap the brightest highlight that must hold detail: the snow, not the glint of the sun. The order doesn’t matter: of the two points, the darker one is the shadow.
- Two markers appear on the photo with the zone each one reads (‘Shadow · II½’, ‘Highlight · VIII’), and the bar tells you where the highlight falls and what to do: ‘Shadow on Zone III, the highlight falls on VIII → N−1, exposure +0.5 EV’.
- Apply sets camera exposure and development to the suggested values, in a single History step.
The controls in the bar#
- Shadow on III: Adams’s placement, the shadow with full detail.
- Shadow on II: leaves just a hint of texture, for darker, more dramatic prints.
- Retake: clears the two points and, if you had already applied, puts exposure and development back as they were.
- Apply: sets exposure and development to the suggested values.
- Done (or Esc): back to the Hand.
The rule#
If the highlight falls on VII, development is normal (N). Each zone above asks for one step of N−, each zone below one step of N+. Development also changes the film’s working speed, so the suggestion corrects the exposure by half a stop per step. Beyond N±2 the film can’t do it alone: the bar says so, and the rest is up to the grade and the burning.
The reading allows for what the film ‘sees’: the filter on the lens, the emulsion’s spectral sensitivity, the exposure and, with long exposures, reciprocity failure.
When Apply stays off#
So that one wrong tap can’t send the print into black, the bar tells you why and Apply stays off if:
- the dark point isn’t a shadow (above Zone V);
- the shadow is black with no detail (below Zone 0);
- it would need more than 3 EV of correction;
- shadow and highlight are almost the same.
Test strip#
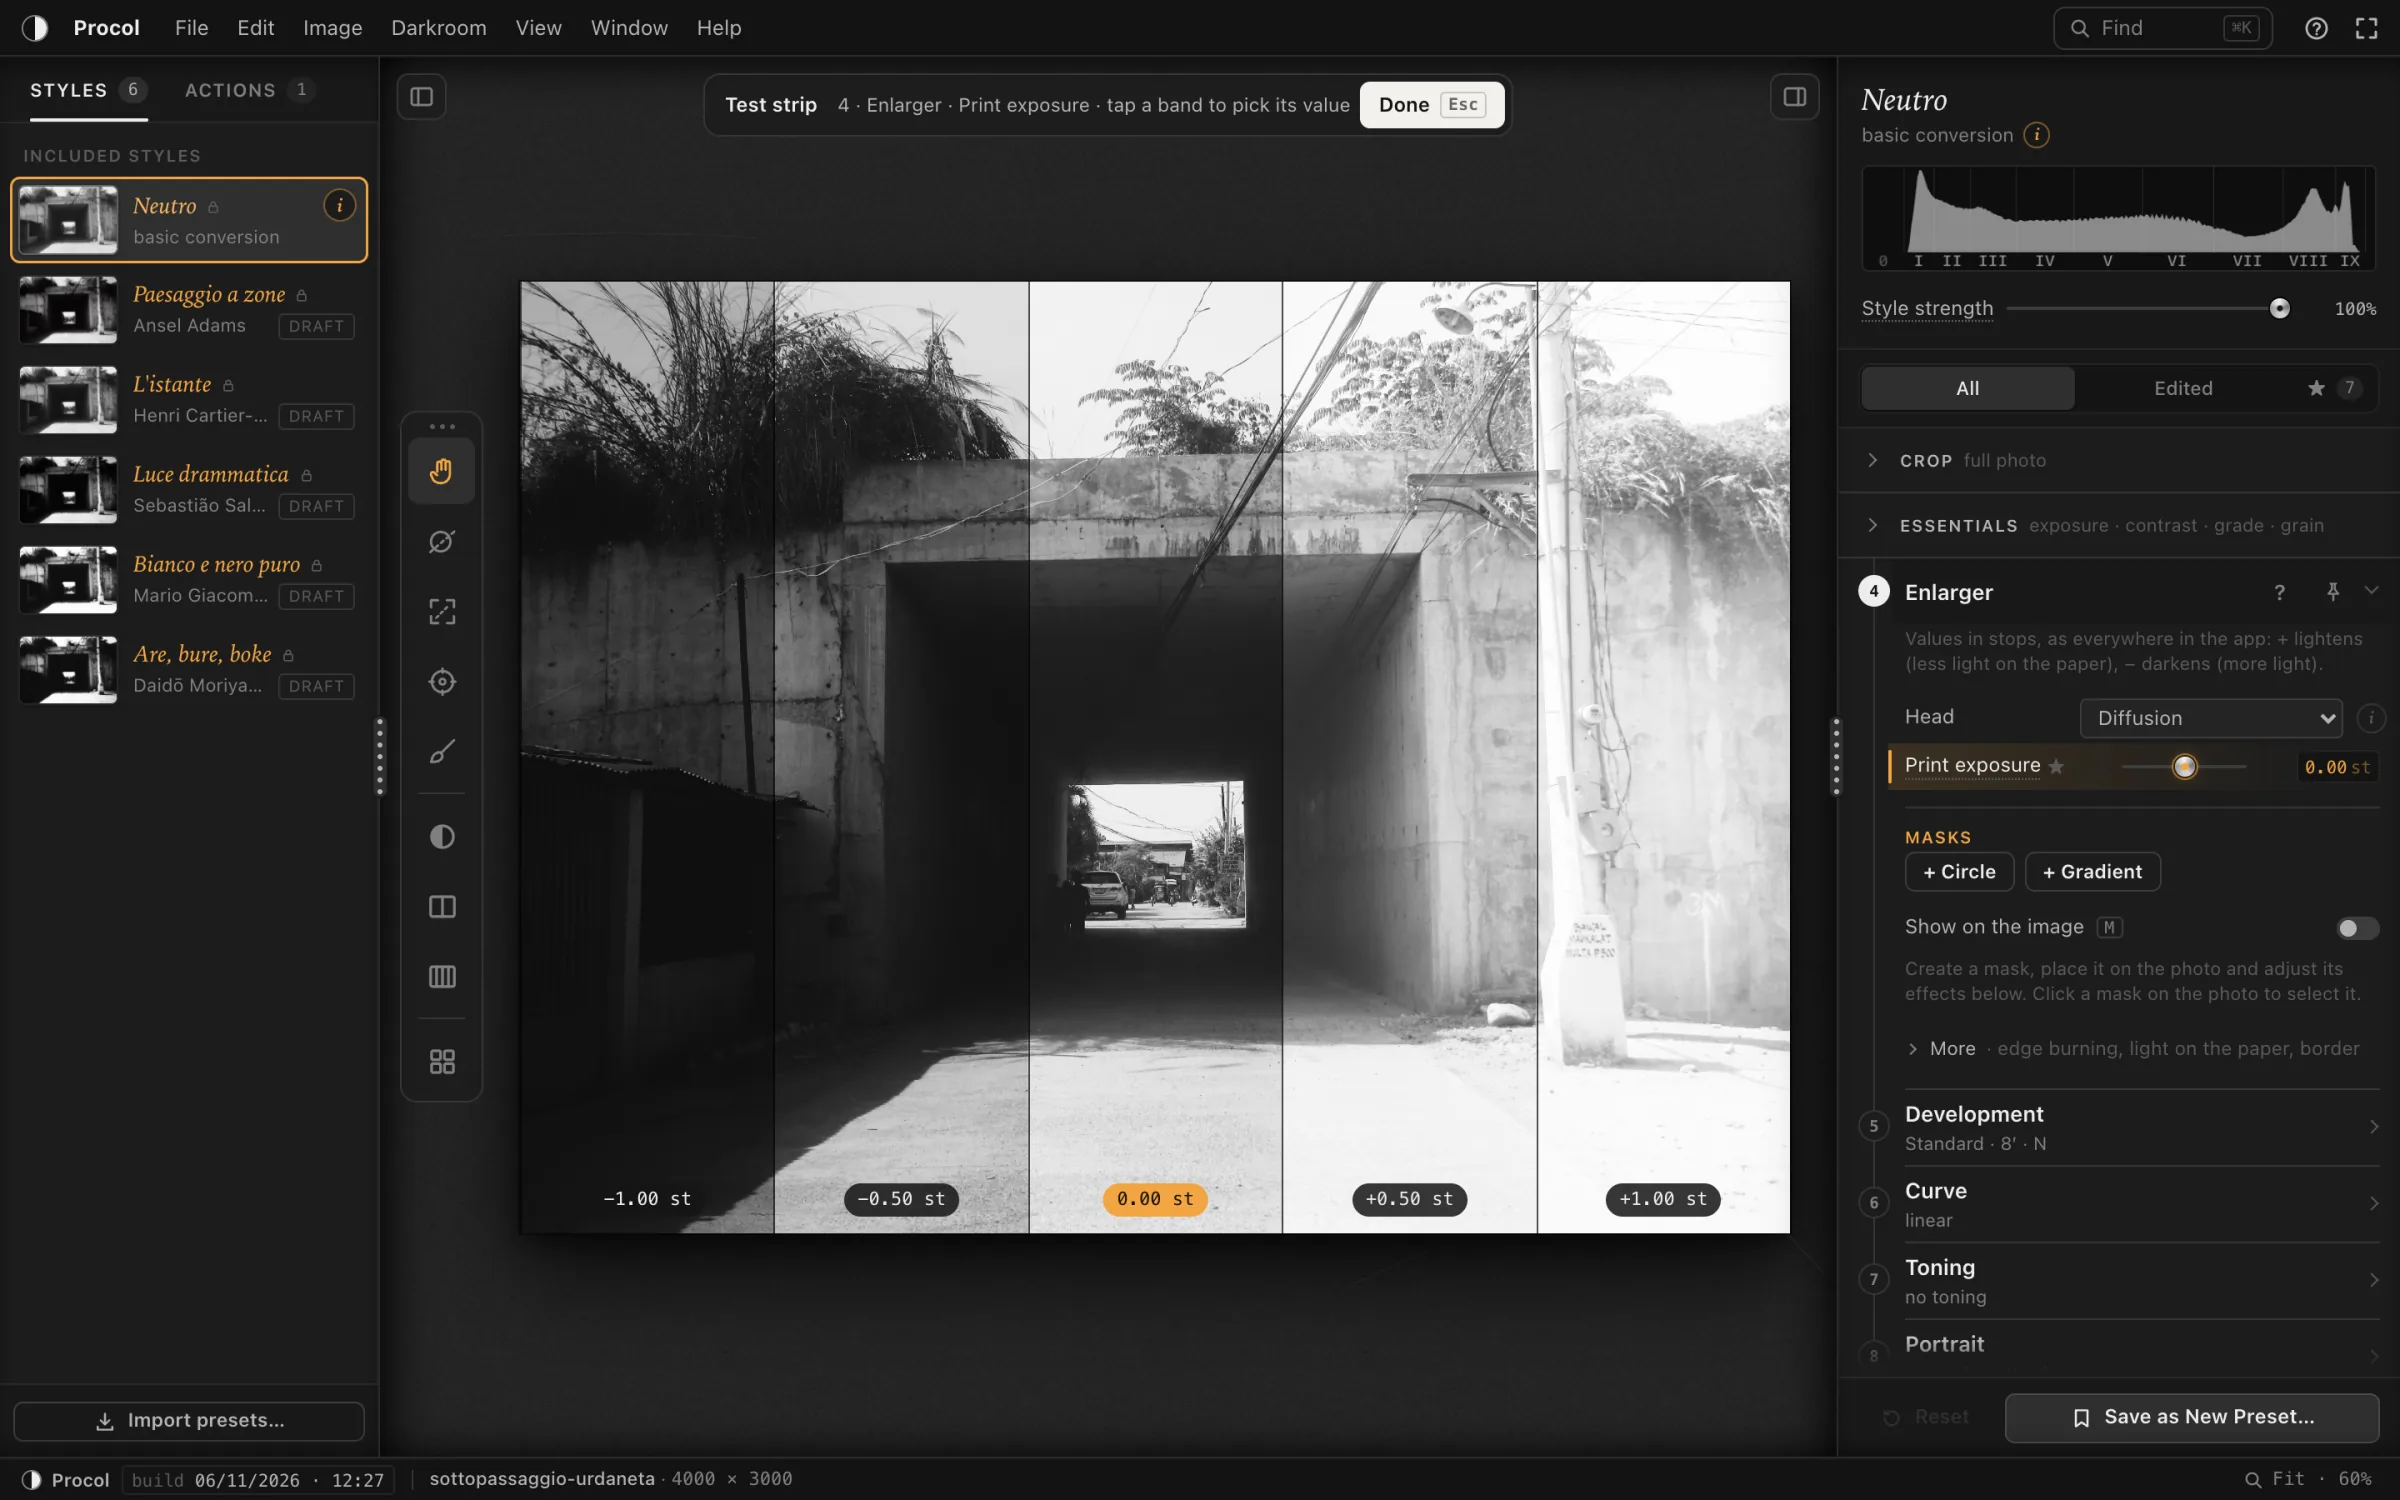
The Test strip divides the print into five bands, with one control at rising values: like the strip of paper exposed for different times under the enlarger. It works with any slider, not just exposure.
- Choose the control: tap the label of a slider (for example Print exposure in Stage 4 · Enlarger). The row lights up in amber: the control is on the dial. Selecting a mask also puts its exposure on the dial.
- Open the strip: Darkroom › Test Strip (the item also names the control: ‘Test Strip · Print exposure’) or T.
- Look at the bands: each has its value written on it. The current value sits in the middle, when there’s room on both sides.
- Tap the band you like best: the control takes that value and the strip closes. Done (or Esc) closes without changing anything.
The step between bands is half a stop for camera exposure, print exposure and masks; for the other sliders it’s about a tenth of the travel. With sliders that lighten or darken, the bands run like the slider itself, from the darkest on the left to the lightest on the right: in Procol + always lightens.
If no control is on the dial, Procol reminds you: ‘Put a control on the dial (tap its name) to make a test strip’.