Getting started
The interface
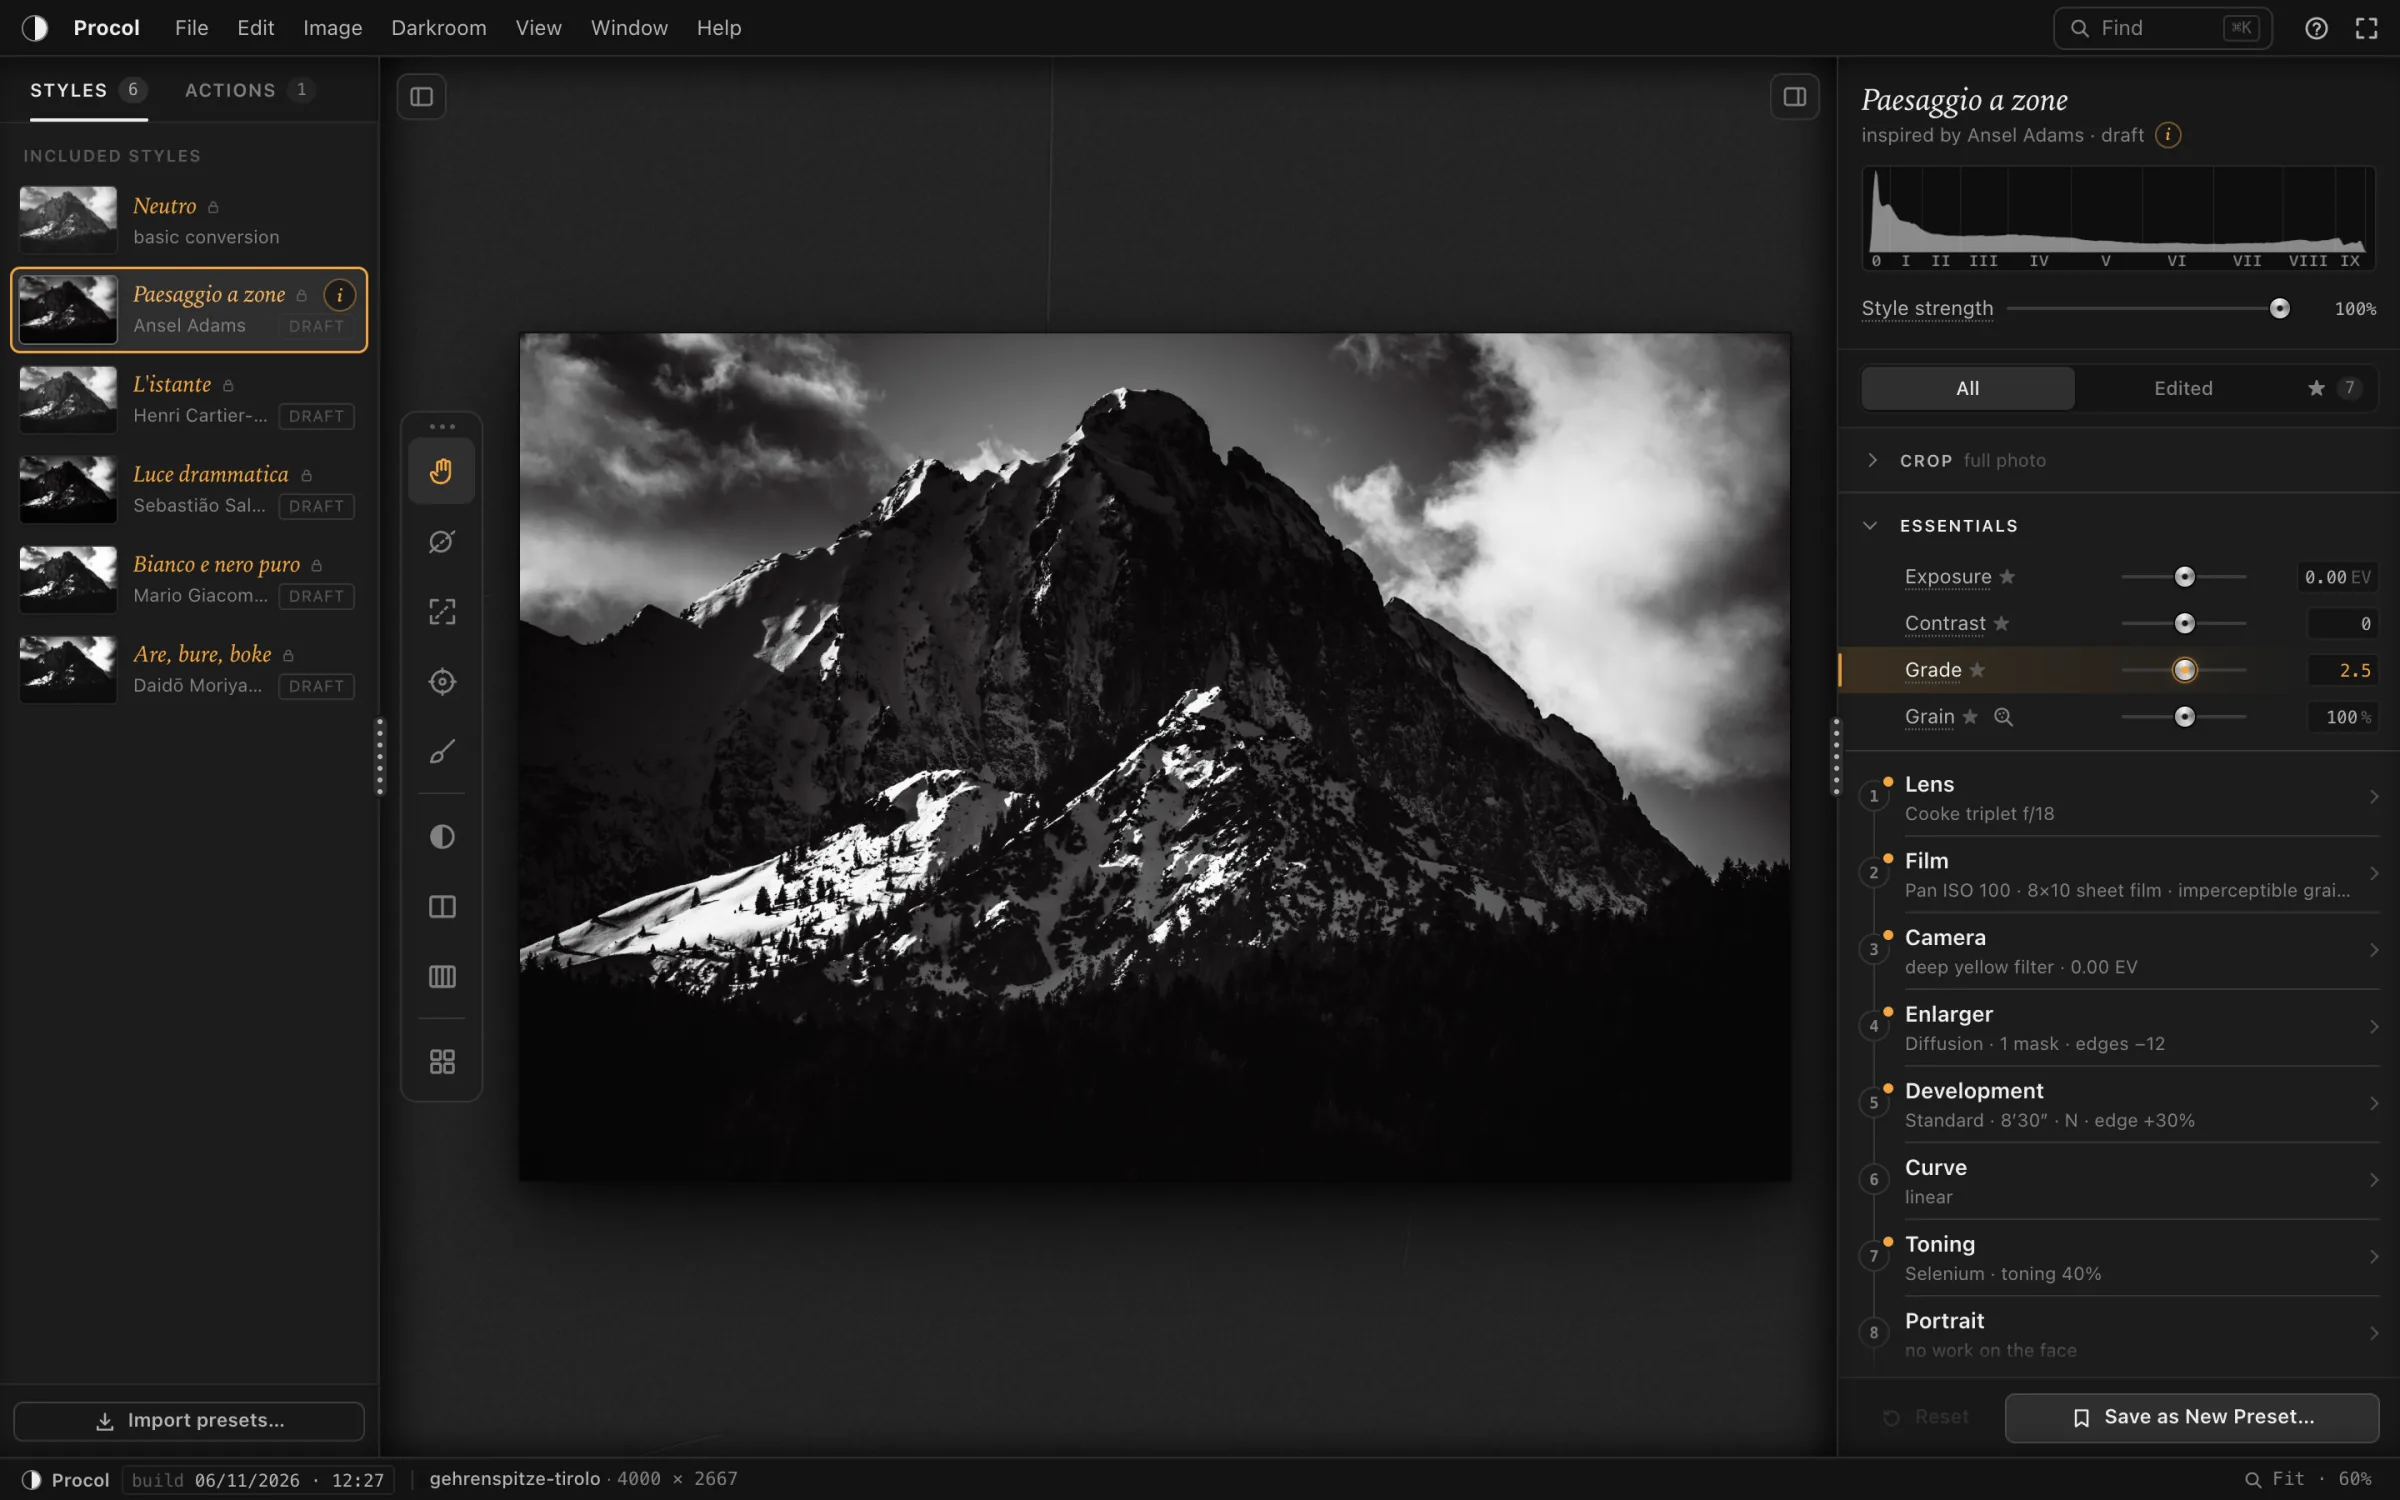
A tour of the Procol window: the menus, the styles column, the print with its tools, the inspector with the Essentials and the stages, the search and the status bar.
The Procol window is a printer’s bench seen from above. From left to right: the sidebar with the styles and the actions, the print with its tools in the middle, and on the right the inspector with the analogue chain. Above, the menus; below, the status bar.
The menus#
Along the top runs the macOS menu bar: Procol, File, Edit, Image, Darkroom, View, Window, Help. Next to each item its shortcut is written, so you learn it by using it. Items that make no sense at that moment, Export… with no photo open for instance, stay visible but greyed out: you know they exist and where to find them.
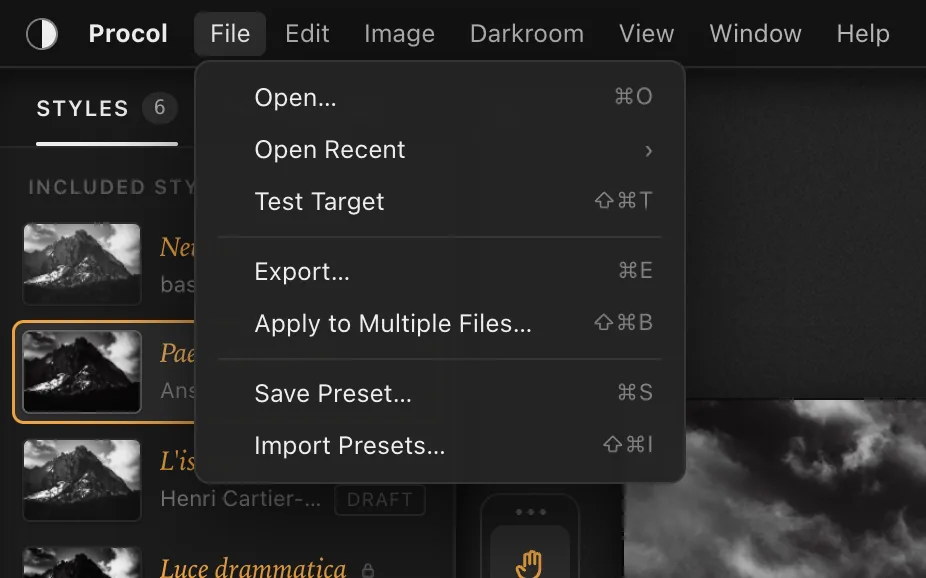
What each menu holds, in brief:
| Menu | What it holds |
|---|---|
| Procol | About Procol, installing it as an app, the licence, the guide and the shortcuts.About Procol and the subscription (Subscription…). |
| File | Opening a photo or the test target, exporting, applying to multiple files, saving and importing presets. |
| Edit | Undo and Redo, copying and pasting settings, the three levels of reset, deleting a mask,resetting the style, the search. |
| Image | The style and its strength, the crop, the actions. |
| Darkroom | The stages, one by one; the tools that work on the print (Hand, Dodge and Burn Masks, Spot Meter, Brush); the Test Strip; the Grain Editor and deleting a mask. |
| View | Original, Compare, Zones, zoom, the Proofs; showing or hiding the sidebar, the inspector and the history; the surround of the print; full screen; the type of interface.the language (Language · Lingua); full screen. |
| Window | Brings Styles, Actions and History back into view. |
| Help | This guide (in a new tabin your browser): the home page, Getting Started, the analogue chain, the Recipes, the shortcuts, the Glossary. |
In windows narrower than 1280 points the bar folds into a single button, ☰ Procol, at the top left: inside are the same menus, with the command search at the top. The menus work with a finger, with the mouse and with the keyboard (arrows, ↵ to choose, Esc to close).
On the right of the menu bar there are two buttons: ? opens this guide in a new tab (F1), and the square with corners takes Procol to full screen (View › Full Screen, ⌃ ⌘ F).
At the top right of the window there are three buttons: Find (⌘ K), ?, which opens this guide in your browser (Help › Procol Guide, ⌘ ?), and the square with corners, which takes Procol to full screen (⌃ ⌘ F).
The left sidebar#
The sidebar has two tabs, Styles and Actions; the number next to the name tells you how many items it holds.
- Styles: at the top the Included styles, Procol’s six starting points; below them, if you have any, My presets. At the bottom the Import presets… button loads preset files you’ve been sent or saved elsewhere. The styles are described in The styles, presets in Working in order.
- Actions: the sequences of adjustments you’ve recorded, to run again on other photos. See Actions.
At the bottom of the sidebar, when you ask for it with View › Show History, the history of every step taken on the photo appears. See The history.
Drag the right edge of the sidebar to widen or narrow it; a double-click on the edge takes it back to its starting width. To hide it altogether there’s the button with the split box in the top left corner of the print, or View › Left Sidebar (⌃ ⌘ S). The inspector has its twin button in the top right corner (View › Inspector, ⌥ ⌘ I): with both hidden, the print has all the room.
The print and the tool strip#
The print sits in the middle. On its left, on a vertical strip, are the tools you work on the picture with and the views you look at it through. Each button’s name appears when you hold the pointer over it; every tool also has its own menu item.
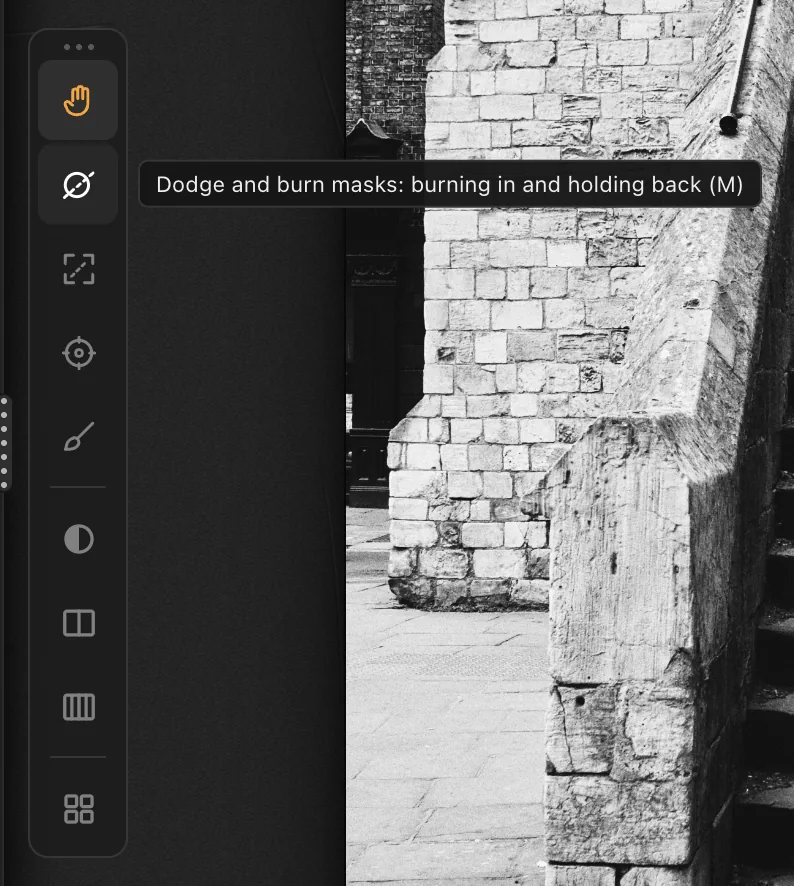
The tools, one at a time:
| Tool | Key | What it’s for |
|---|---|---|
| Hand | H | Moves the print around when it’s enlarged. It’s the resting tool: Esc always comes back to it. |
| Masks | M | Burning in and holding back over an area, like the cards under the enlarger. See Masks. |
| Crop | R | Crops and straightens the print. See Crop. |
| Spot meter | E | Reads the shadow and the highlight and suggests exposure and development. See Viewing and checking. |
| Brush | B | Burns, dodges, adds contrast or smudges, freehand. See Viewing and checking. |
The views, below a thin line:
| View | Key | What it’s for |
|---|---|---|
| Original | Space | Hold it down to see the starting photo. |
| Compare | C | Splits the view: original on the left, print on the right. |
| Zones | Z | Shows the print divided into the zones of the Zone System. |
| Proofs | P | Four prints of the same negative, in different styles, side by side. |
They’re all explained in Viewing and checking. Some tools open a bar above the print with their own commands and a Done button.
The strip can be moved: grab it by the three dots at the top and drag it wherever it’s least in your way. Procol remembers where you put it.
The space around the print has a tone you can choose in View › Surround: Dark, 18% Grey or Paper White. A dark surround makes the print look lighter than it is, a white one makes it look darker: if you have to judge tones for paper, try the grey.
The inspector#
On the right is the inspector: the panel where the print is adjusted. From top to bottom:
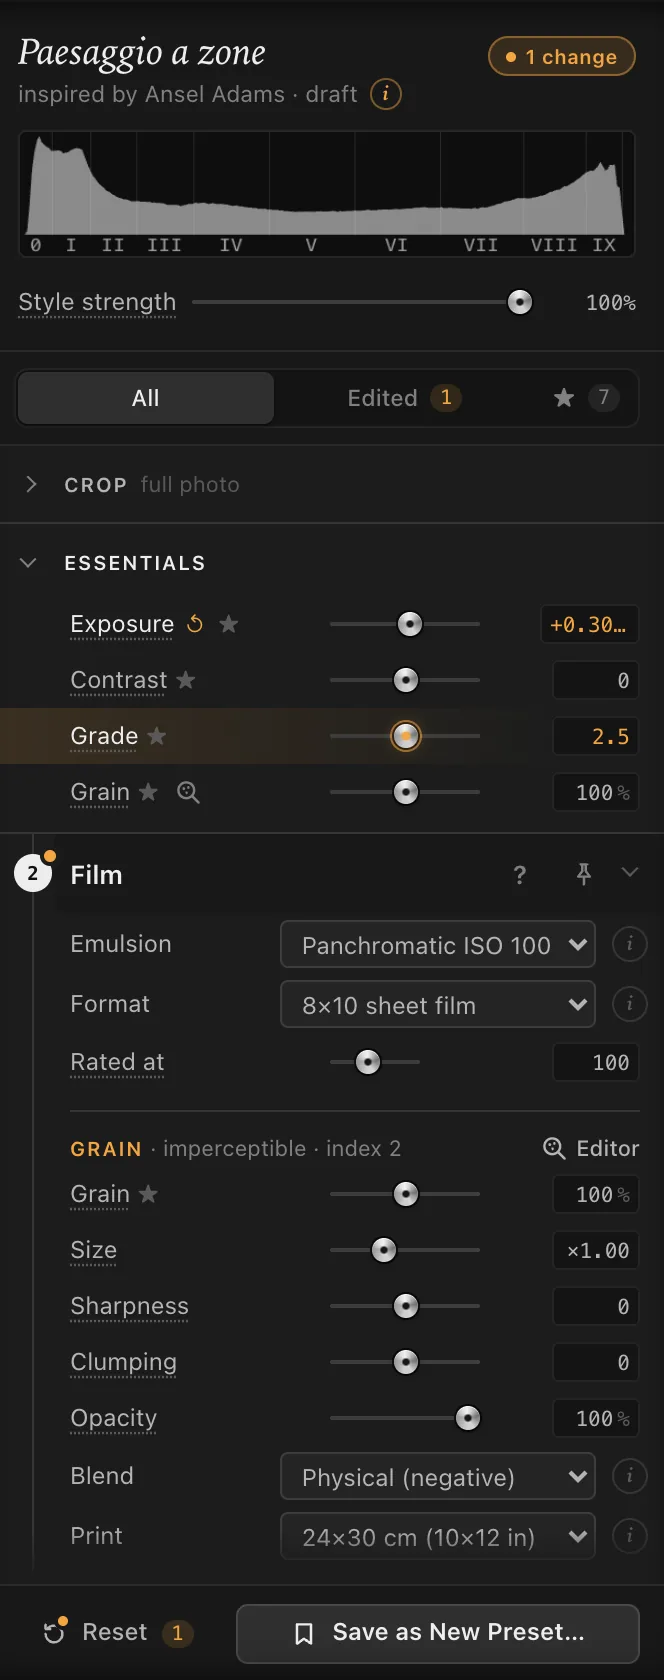
- The name of the style in use and, below it, who it’s inspired by. The i opens Style info. When you move away from the style, ● N changes appears next to the name: tap it and the inspector shows you only what you’ve changed.
- The histogram, divided into the eleven zones of the Zone System, numbered in Roman numerals from 0 to X (the narrowest zones go without a number): it tells you how much of the print falls in each zone.
- Style strength: blends the style with the neutral conversion (see The styles).
- All · Edited · ★: what to show below (see further on).
- The Crop block, closed, with a summary of the crop (for example full photo).
- The Essentials: four sliders always within reach.
- The stages of the analogue chain, numbered from 1 to 9.
- At the bottom, Reset and the save button: Save as New Preset… on an included style, Update Preset… on one of your presets.
The Essentials#
Four sliders for everyday corrections:
| Slider | What it does | Where it lives |
|---|---|---|
| Exposure | The light that reached the film when the picture was taken. | 3 Camera |
| Contrast | The distance between shadows and highlights. | 6 Curve |
| Grade | How hard the paper is, from 0 to 5. | the paper, under the enlarger |
| Grain | How much the silver grain shows. | 2 Film |
They aren’t copies: they are the same values as in the stages. If you move Exposure in the Essentials, you’ll find it moved in Camera too, and the step goes into the history like any other.
Tap the Essentials title to close or reopen the block, and Procol remembers your choice. Crop and Essentials open one at a time, and both close when you open a stage, to make room for it. The Essentials appear in the All view; Edited and ★ already show a focused list.
The stages#
The stages are the steps of the analogue chain, numbered along a vertical line: 1 Lens, 2 Film, 3 Camera, 4 Enlarger, 5 Development, 6 Curve, 7 Toning, 8 Portrait, 9 Post-processing. Each has its own chapter; the overall picture is in the analogue chain.
Closed, a stage tells you in one line where you stand, for example Pan ISO 100 · 8×10 sheet film · imperceptible grain (2) at 24×30 cm. An amber dot next to the number means that stage has moved away from its base values: at a glance you know where the style, or your own hand, has been at work.
Open, it shows its controls, one row per command: label · slider · value, or a drop-down menu with an i that explains the option chosen. Tap the name to open it; open another one and the previous one closes. You can also open them from the Darkroom menu (⌘ 1…9).
In the header of an open stage you’ll find:
- ?: opens the guide’s page for that very section, in a new tabin your browser;
- the pin: keeps the stage open even when you open another, so you can work on two steps together, Film and Development for example. ⌥-click on the header does the same;
- ↺, only if the stage has been changed: takes it back to the style’s values.
More#
Each stage shows the controls you need most often first. The rest sits in the More row, which says what it holds (for example coating and lens hood, lens character, soft focus, light falloff) and how many values have been changed. It opens by itself when one of those values changes, for example when you choose an emulsion that touches them.
The sliders#
Every slider has a few details worth knowing:
- The style mark. A small notch on the track marks the style’s value. When you move away from it, ↺ appears next to the label: tap it, or double-click the label or the value, to go back there.
- − and +. At either end of the slider they move it by a coarse step, about a twentieth of the travel; hold them down and the value keeps running. With a mouse they appear on the row under the pointer, outside the track, so they never cover the handle.
- The mouse wheel over the slider gives the fine adjustment, one minimal step per click; with ⇧, the coarse step. If you’re scrolling the panel and pass over a slider, the panel keeps scrolling: no values changed by mistake.
- The ☆ next to the label adds the slider to your bench (see below). With a mouse it appears on hover; on touch it’s always visible.
- Tapping the label makes that command the active control: the row turns amber. The Test Strip works on the active control, and Edit › Reset Control takes it back to the style’s value.
All, Edited, ★#
Above the Essentials, three buttons decide what the inspector shows:
- All: every stage, with the Essentials;
- Edited: only the stages and rows that differ from the style. It’s the quickest way to remind yourself what you’ve done;
- ★: your bench, that is the sliders you’ve marked with the star, in process order, without opening the stages.
The bench starts out with a few sliders we’ve chosen; take them off and add others until it’s your everyday table.
Resetting, on three levels#
You can always go back, and choose how far:
| What | How |
|---|---|
| A single slider | ↺ next to the label, a double-click on the label, or Edit › Reset Control for the active control. |
| A stage | ↺ in the header, or Edit › Reset Stage. |
| The whole style | Reset at the bottom of the inspector, or Edit › Reset Style. |
Every reset goes into the history: Edit › Undo (⌘ Z) undoes it.
An amber dot on Reset, with the number of changes, tells you that you’ve changed the style and haven’t saved yet. It goes out with Reset or when you save a preset. If you change style at that point, a window asks what to do: Cancel, Don’t save or Save preset…. If you close or reload the page, it’s the browser that asks you to confirm. See Working in order.
Find a command#
Procol has a lot of commands; you don’t need to remember where they are. The Find button at the top right, next to ? (or Edit › Find a Command…, ⌘ K; in narrow windows it’s also at the top of the ☰ Procol menu), opens a box where you type what you’re looking for, in your own words if you like.
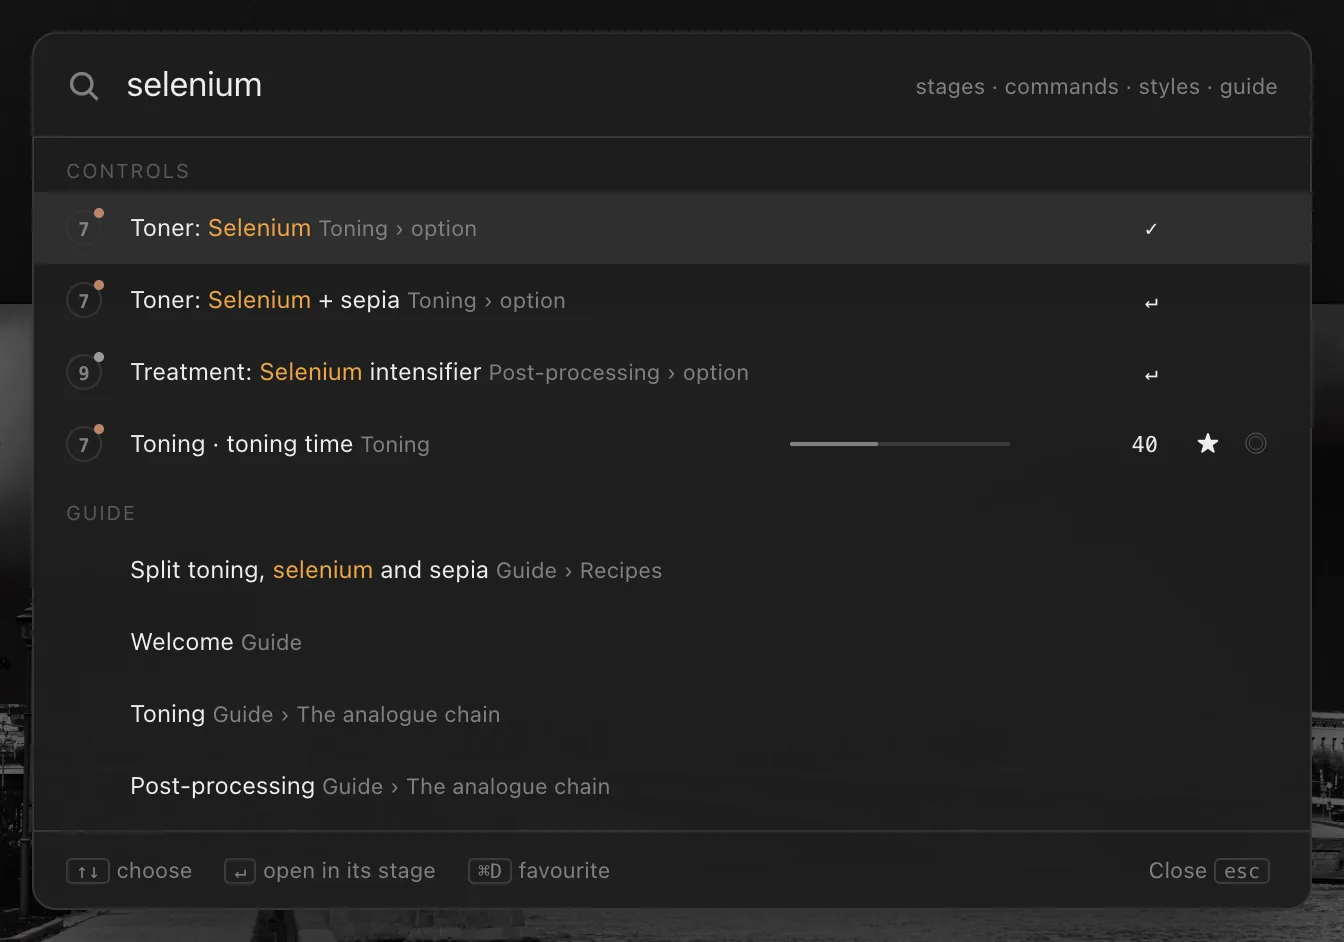
Find turns up:
- adjustments, by name and by synonym: ‘selenium’, ‘push’, ‘vignette’, ‘sharpness’. Each row says which stage it lives in and its current value;
- menu options, such as ‘Toner: Selenium’ or ‘Developer: Fine-grain’: choosing one applies it at once;
- menu commands, styles and the parts of the built-in guide.
Move with the arrows and press ↵ to open the stage, bring the row into view and make it the active control. ⌘ D, or the ★ on the row, adds the slider to the bench. Adjustments only appear with a photo open.
The status bar#
Along the bottom of the window, full width, a thin line tells you where you are:

- on the left Procol and the build, with date and time: that way you always know which version you’re using, handy if you write to us about a problem;
- next to it, the licence dot: green with the email the licence is registered to, orange with the date if it has expired, red if there isn’t one. Tap it to open the Licence window;the subscription status: No subscription, Free trial until… or Subscription active. A click opens the Subscription window (see Procol for Mac);
- then the open photo, with its dimensions in pixels and the word edited if there are unsaved changes;
- on the right the magnifier, which shows the current magnification (Fit, that is the whole print in the window, with the percentage). Tap it to go to 100% and back again. See Viewing and checking.
Desktop or tablet#
Procol picks the right interface by itself: desktop with mouse and trackpad, tablet with a finger on a large enough screen. If you want to force it, there’s View › Interface with Automatic, Desktop and Tablet. The commands are the same; the layout and the size of the buttons change.
Esc, one layer at a time#
Esc closes things one at a time, starting from the last one opened: first menus and windows, then proofs, test strip and tool (back to the Hand), then zones, compare and 100%. If you get lost, press it a few times and you’re back in front of the print.